Setting Mend UI for Pipeline Scanning
This document assumes you have read the following document:
Mend Platform Rollout Overview
Please read the previous document prior to continuing
Preparing the Mend UI for Integration
Org Structure
One organization should be used for all of pipeline results.
Scanning into multiple organizations creates issues as data is not shared between the orgs. Any changes to libraries such as licensing, ignoring specific CVEs, or suppressing alerts are applied to only one org and will need to be repeated in every org creating a lot of manual work.
An organization should have been created for you by a Mend.io Representative. Please reach out to your CSM if you need assistance getting access to your organization.
Data Structure
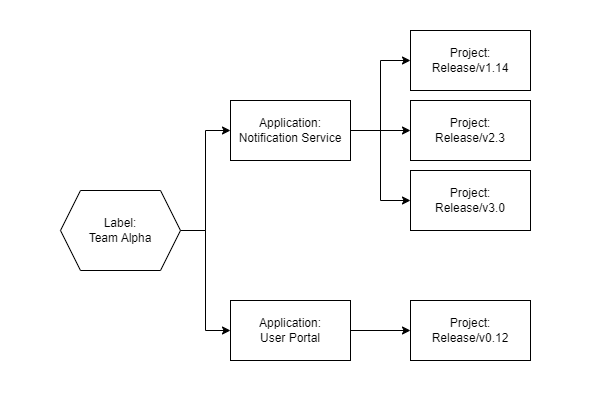
The Mend Platform has two levels of structures to organize your scan data: Applications and Projects. An application has many projects. Viewing an application within the Mend Platform will show all the vulnerabilities for every project underneath it.
The UI should represent the findings for branches released to production. If scanning in a feature branch or pull request pipeline, these results should not be uploaded to the UI to reduce noise.
In addition, Labels can be assigned to Applications or Projects in order to group them together for dashboard review. It is important to have an Application/Project structure that makes sense for your organization and how they want to view the data.
Below is the recommended approach for structuring scans.
Applications
Represents a single application within the organization
Projects
Represents the scanned branches of the application
Labels
Used to represent the business unit or development team responsible for the application.

Applications, projects, and labels can be created manually though the UI or created dynamically at scan time by setting variables within the CI/CD pipeline for more information see the documentation below:
Manage your applications in the Mend Platform
Manage your Projects in the Mend Platform
Create and Assign Labels to Applications in the Mend Platform
Access Control
Mend controls user access to information within the UI through Groups and Roles.
Groups are a collection of users. Mend will automatically create two groups when an organization is created: Admin and Users. Users have read-only access to the application and Admins have full access to the application.
For instructions on how to create groups, please follow Manage Groups in the Mend Platform
Roles are the permission level within the application. These are split into Organization level and Application level roles.
Roles can be applied to Groups granting permissions to every user in that group or to Users directly. Mend recommends managing user permissions through groups and only assigning direct permissions to users as an exception.
For instructions on assigning roles to groups and see the permission level of each role see Manage Roles in the Mend Platform
When integrating with SAML integrations, users can be added automatically to groups but Mend will never automatically assign a Role to a group except the default Admin and User groups created with the Organization. See here for more details.
Adding Users
Users can be added manually or automatically through the SAML integration.
Once a user signs in, they will be assigned to the users group automatically and have read view of all applications/projects.
For instructions on how to add users manually see Manage Users in the Mend Platform.
SAML Integration
Single Org
Setup SAML Integration by following the documentation for “Organization SSO”. Ignore Role mapping and set up a valid SAML Attribute Statement for the Key Attribute “Groups”. These will become your Mend Groups when a user signs in.
In addition to being added to the Users group, a new user also be assigned a Mend Group created by the SAML Attribute Statement. This group will have no roles.
Additional Guides
For a more detailed guide on how the SAML Access Control is set up, please see SAML Access Control Setup Guide
Next Steps
Start scanning your applications by following: Scanning Your Applications in the Pipeline
