Create the Mend for GitHub Enterprise App
Overview
This article provides step-by-step instructions for creating the Mend for GitHub Enterprise App in your GitHub Enterprise Environment.
Getting It Done
Creating the Mend for GitHub Enterprise App
Go to your GitHub Enterprise instance, select Settings > Organization, and then within the Organization Settings, select GitHub Apps from the Developer settings
Click the New GitHub app button
Enter your GitHub Enterprise password
The Register new GitHub App page is displayed
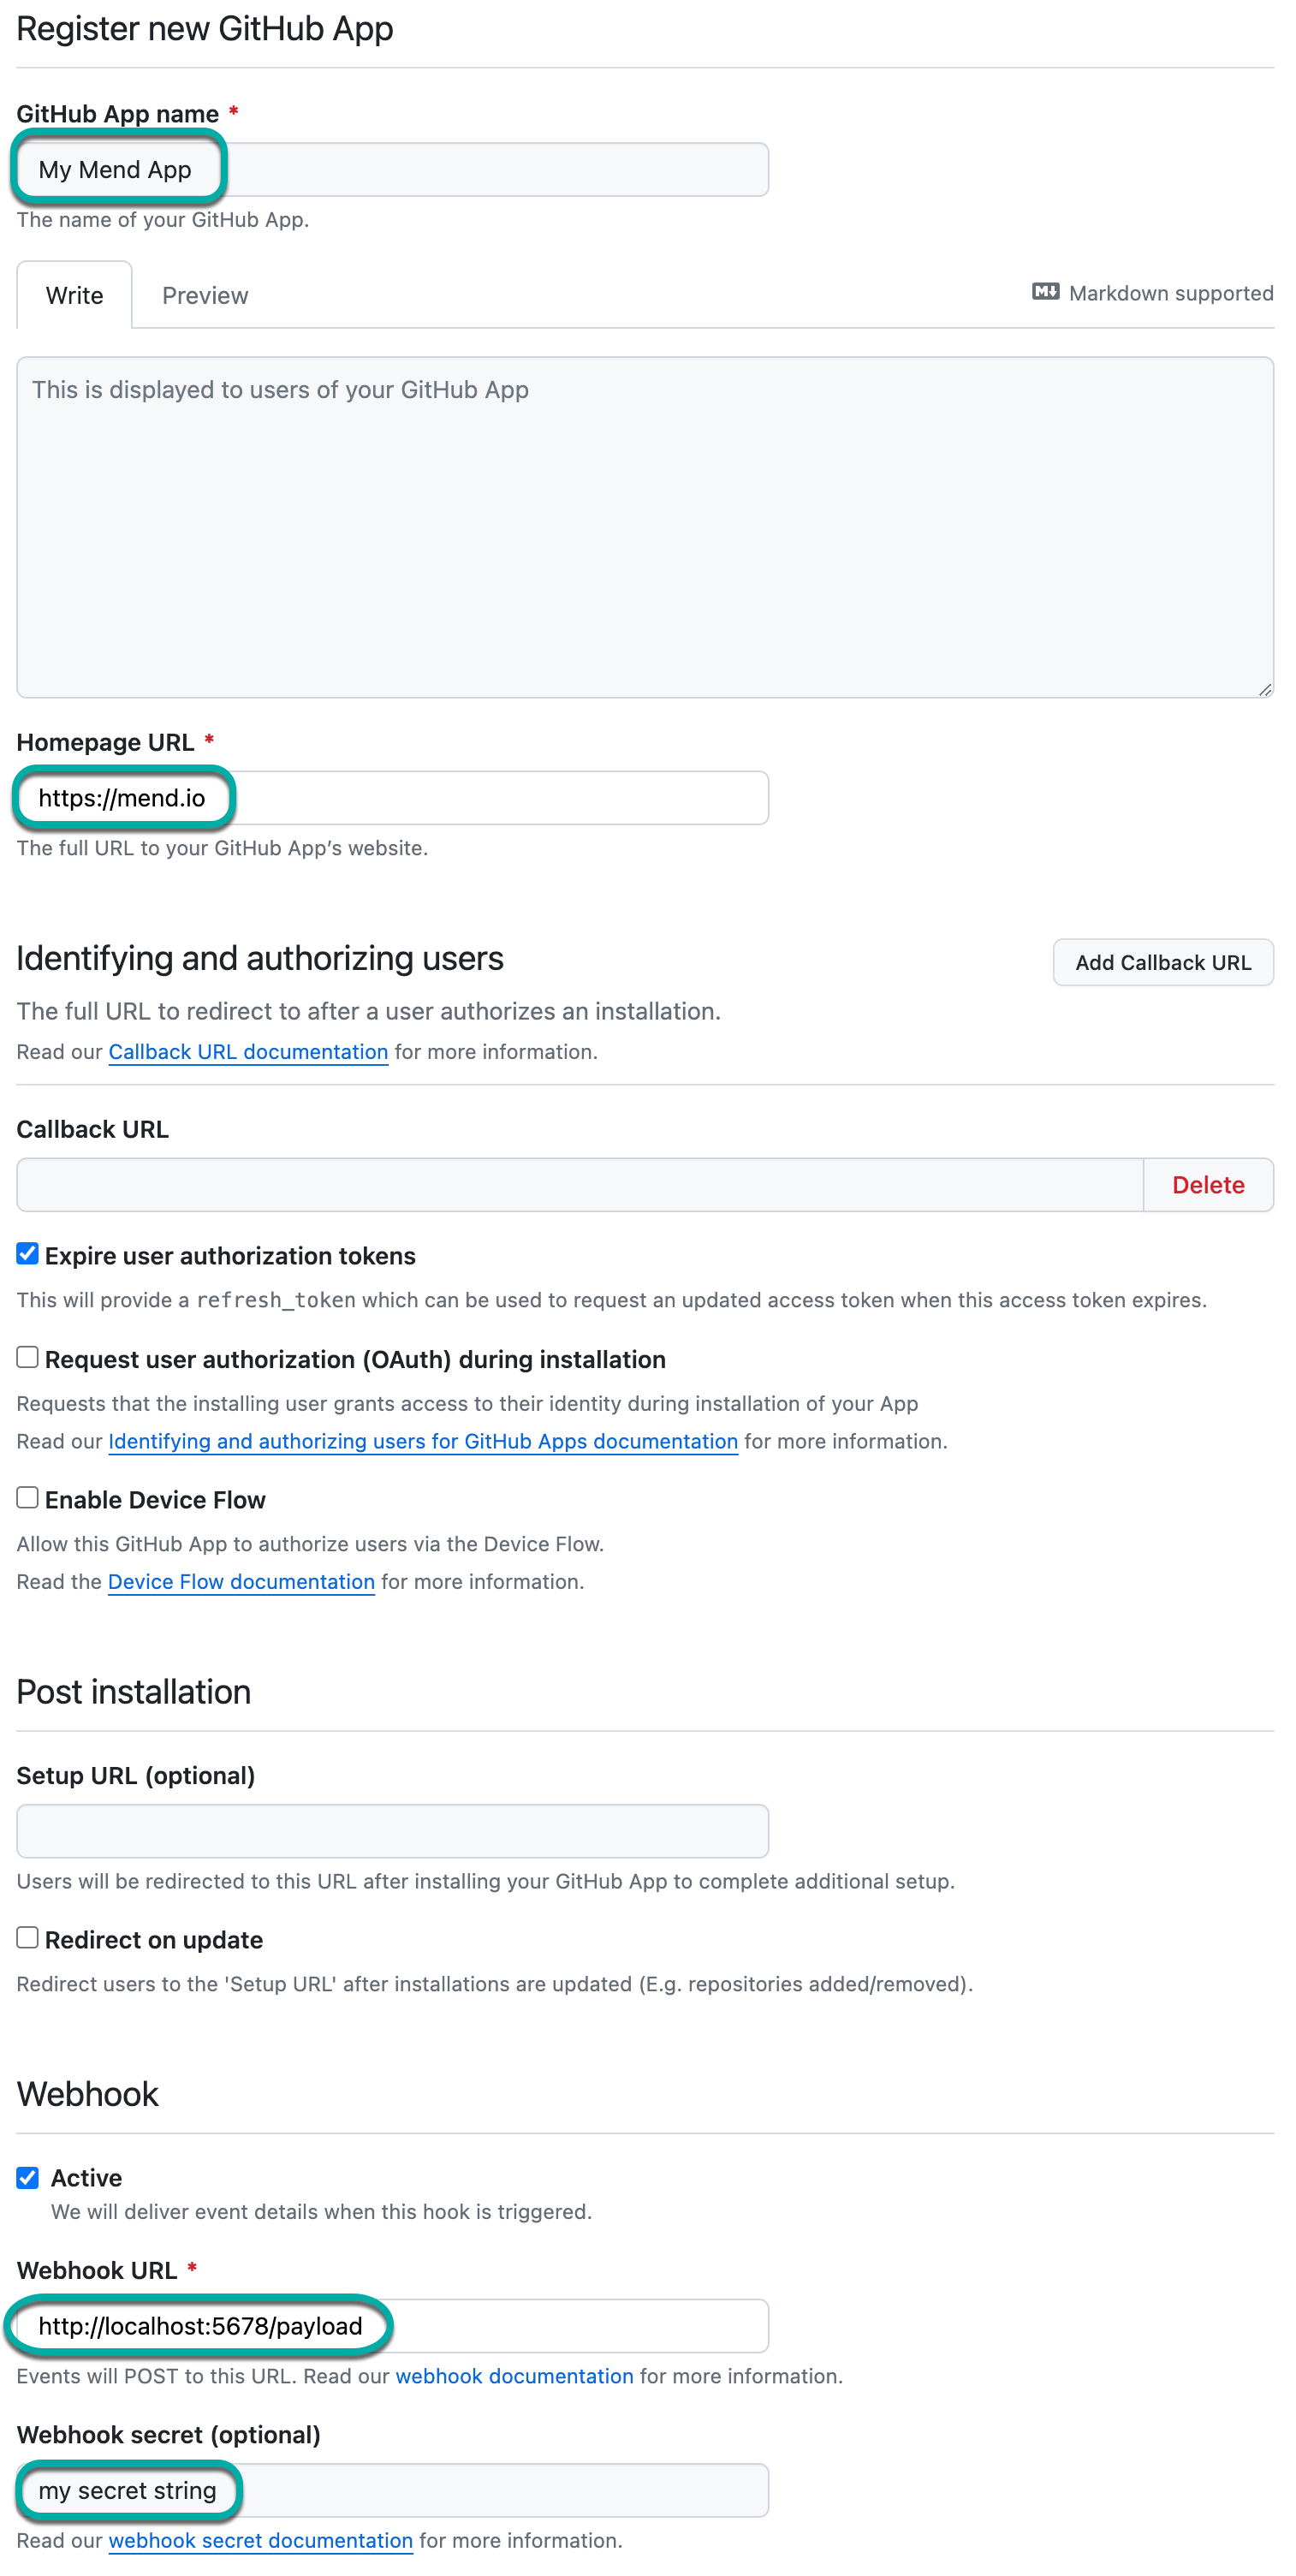
Fill in the fields according to these guidelines in steps 6 and 7
General:
GitHub App name: “Mend App”. NOTE: The name cannot contain an underscore (“__”)
Description: Mend for GitHub Enterprise
Homepage URL: https://mend.io
User authorization callback URL: empty
Setup URL (optional): empty
Webhook URL: A valid URL pattern. This is a temporary value that is changed at a later stage of the installation process
Webhook secret: Generate and enter a secret value (string) and make sure you copy this value somewhere. You will need it for later
Permissions & events:
NOTE: Permission fields that are not specified below should be left as is ("No access")Repository permissions:
Administration: Read-only
Checks: Read and write
Commit statuses: Read and write
Contents: Read and write
Custom properties: Read-only
Deployments: Read-only
Issues: Read and write
Metadata: Read-only
Pages: Read and write
Projects: Read and write
Pull requests: Read and write
Webhooks: Read-only
Workflows: Read and write
Organization permissions:
Custom properties: Read-only
Members: Read-only
Projects: Read and write
Webhooks: Read-only
Subscribe to events: Select the following events:
Check run
Create
Custom property
Custom property values
Check suite
Issue comment
Issues
Member
Membership
Organization
Pull request
Pull request review comment
Push
Repository
This event is optional, subscribing to it will enable a feature that will add
repoArchivedProject tag in the Mend Application for the repositories that were archived.
Team
Team add
Where can this GitHub App be installed? It is recommended to select 'Any account', so that any GitHub Organization can install this App. Alternatively, you can limit it to your own organization
Click the Create GitHub App button
(Optional) Edit the GitHub App and upload a logo for your App
Fill in fields on the Integrations Page
Note: This step differs slightly between the Mend AppSec Platform and the Legacy SCA Application. Instructions for the Legacy Application are available at the bottom of this section.
Open a separate browser tab or window and log in to the Mend Platform.
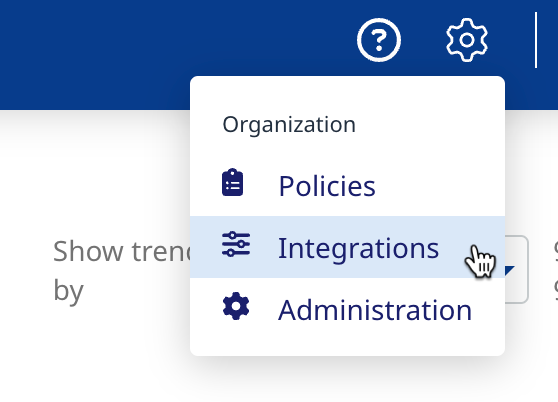
Navigate to the Integrations page by clicking the cogwheel at the upper right corner of the UI:
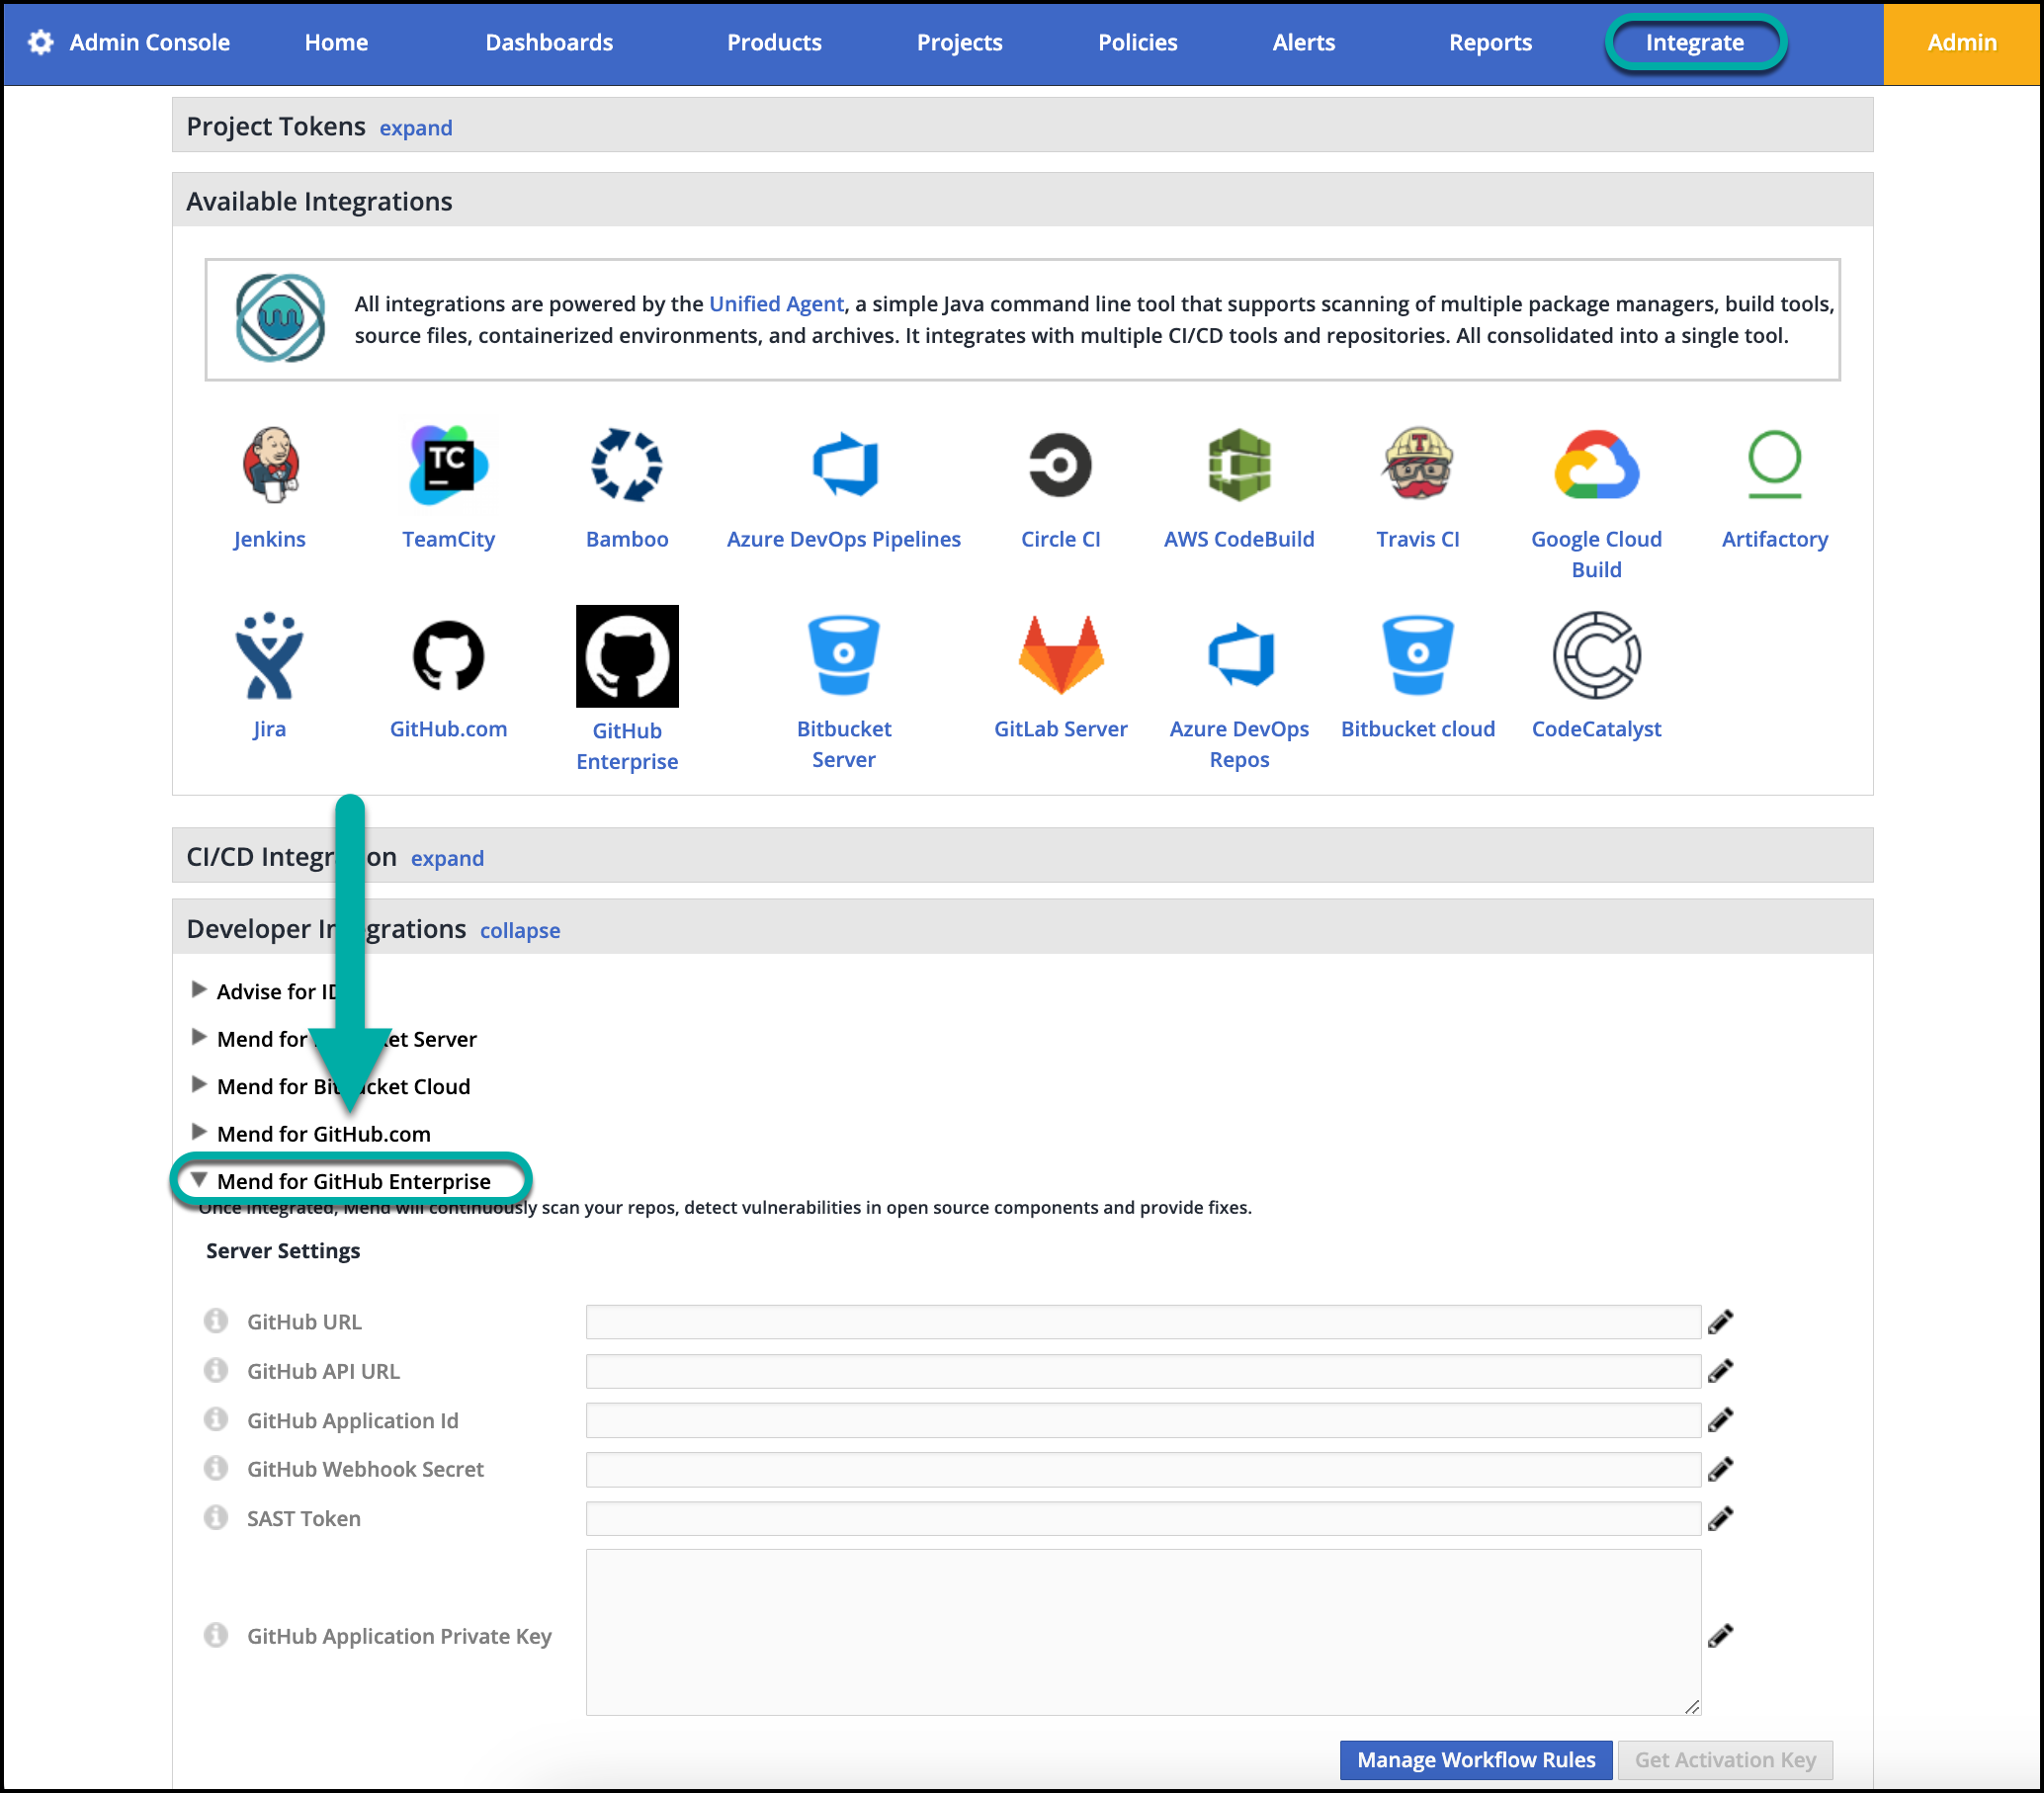
Click the GitHub Enterprise tile under Repositories:

This will take you to the Integrate page, where you are required to fill in the following fields:
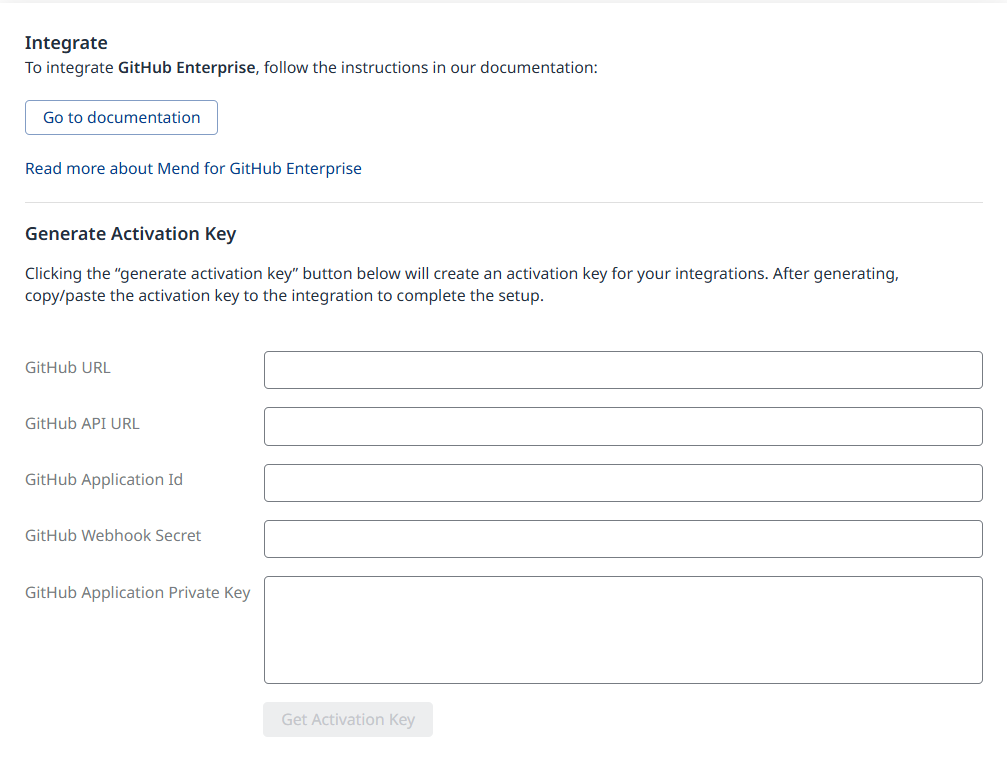
GitHub URL: Your GitHub Enterprise instance Destination URL. For example: https://GitHubEnterprisedev.com.
GitHub API URL: The GitHub API URL value plus '/api/v3' - <https://api.github.com/>/api/v3
GitHub Application Id: From the GitHub Enterprise server UI, go to Settings > Organization Settings > GitHub Apps. Click Edit next to the GitHub app you created previously. Scroll to the About section. Copy the GitHub ID value and paste it as the GitHub Application Id input field value.
Leave this page open in Edit mode, as you will need it for the next field (Github Webhook Secret).GitHub Webhook Secret: Paste the webhook secret that you generated as part of the Install the GitHub Application step.
GitHub Application Private Key: In the Private key section of the Mend App Settings, click Generate private key. Save the private_key.pem file that is generated. Open this file in any editor and copy its contents. Paste the contents in the GitHub application private key input field.
NOTE: The key is encrypted, and its value is not revealed to Mend.
Click Get Activation Key to generate your activation key. A new Service user is created for this integration inside the Mend Application with a WS prefix.
NOTE: Do not remove this Service user and ensure this user remains part of the Admin group.Copy the generated Activation Key to the clipboard. You will need to use it in the next section.
Configuring Deployment Settings
Run the UI configuration tool from the wss-configuration Directory
The UI Configuration tool enables you to configure the deployment file according to your specific configuration requirements.
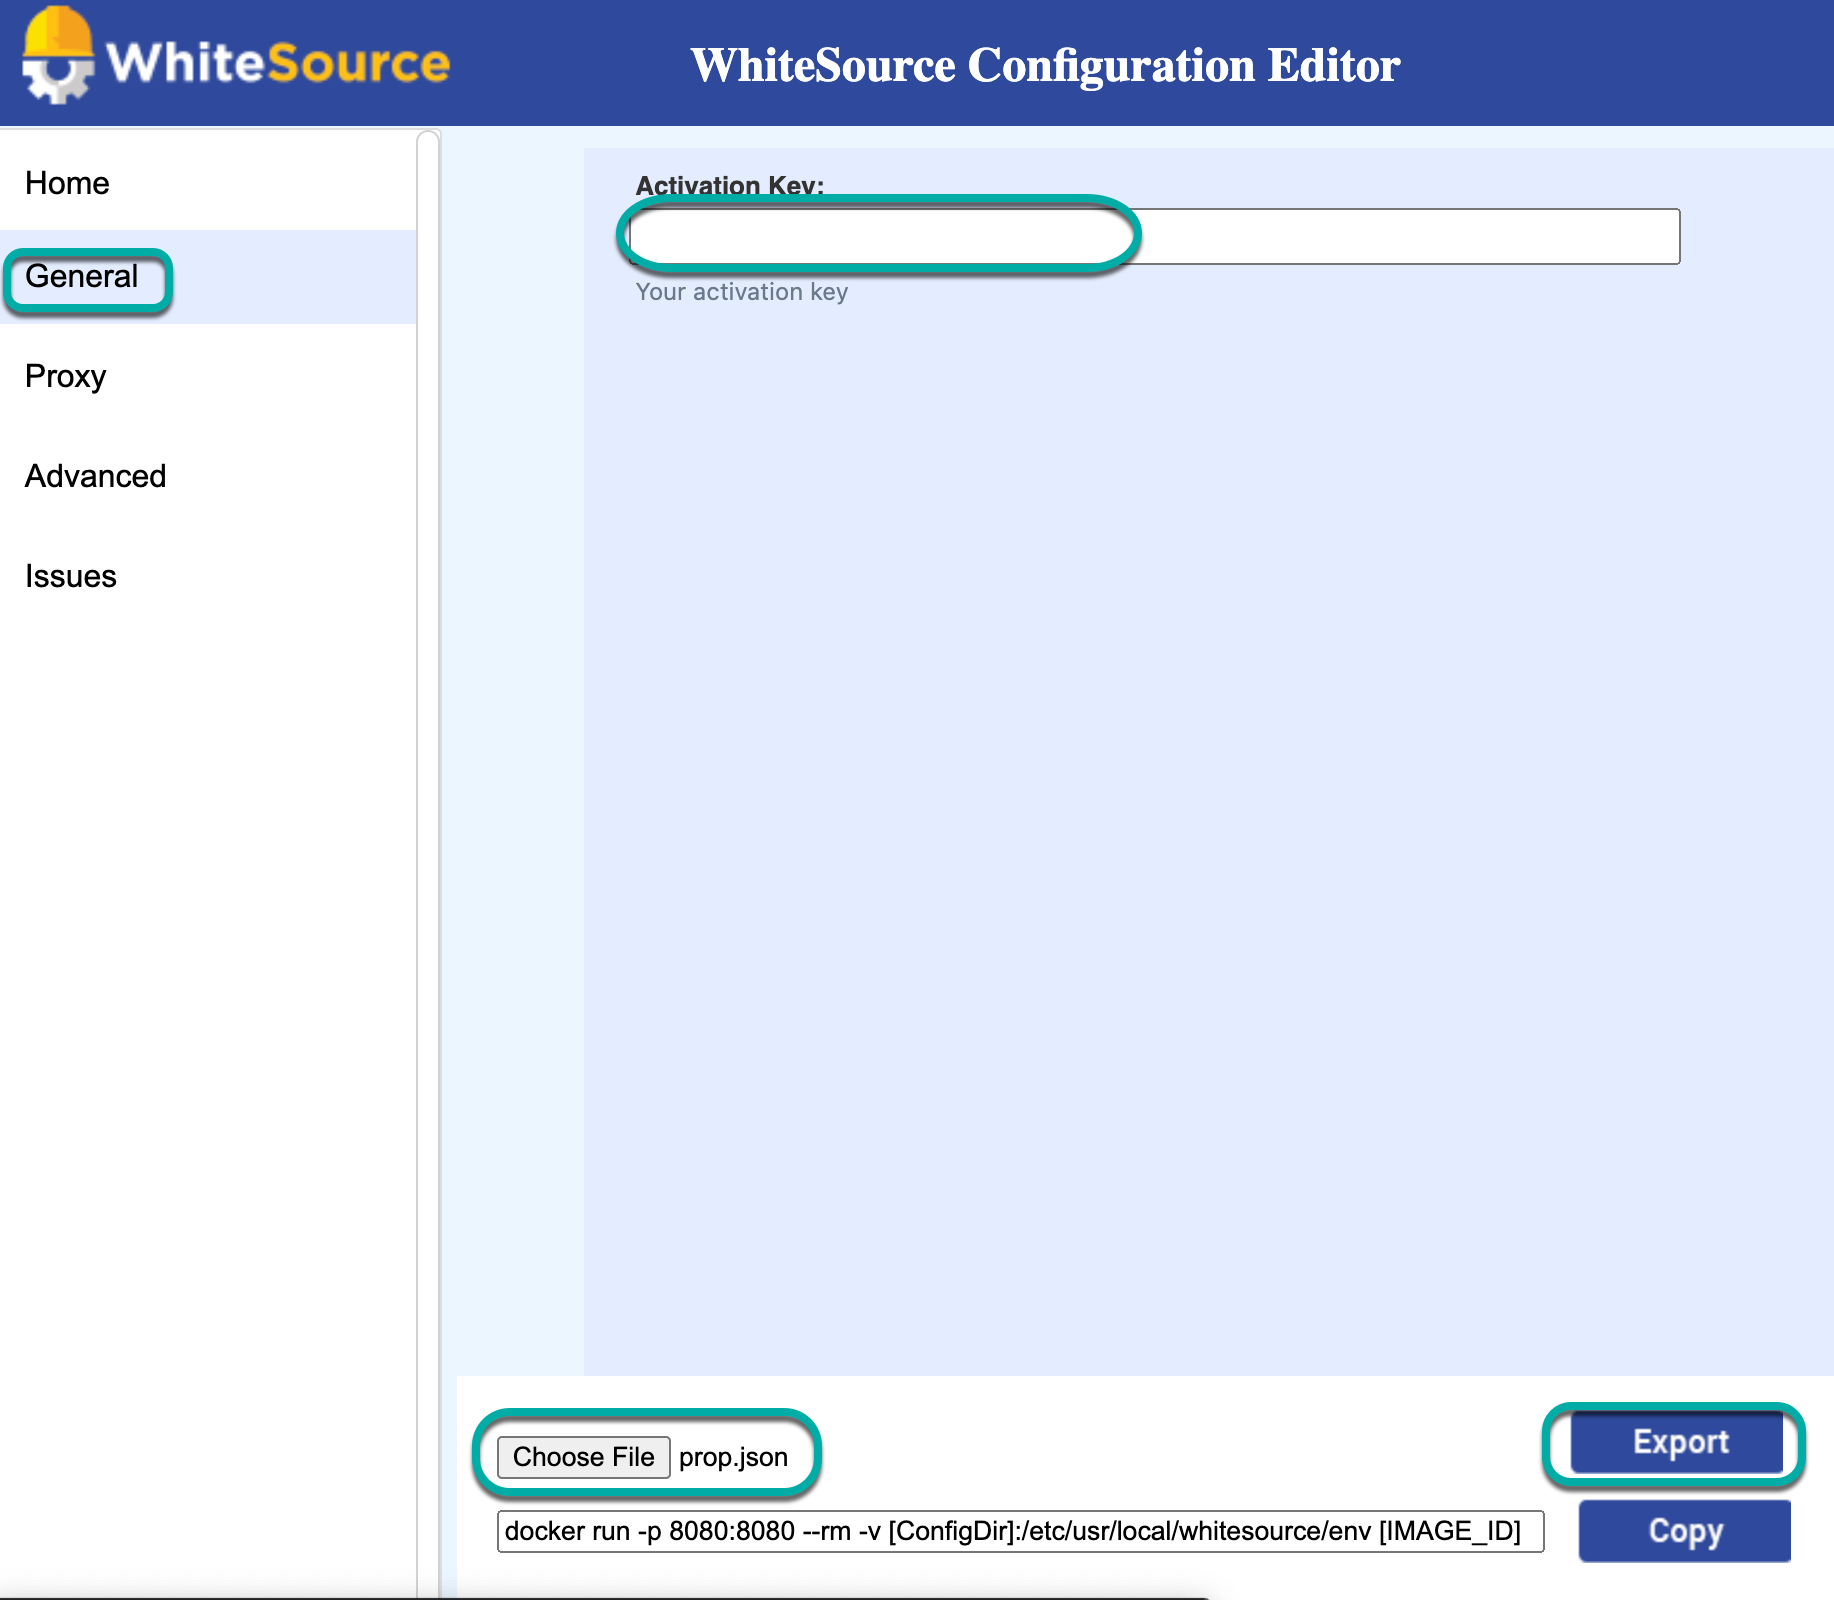
Open the file index.html located inside the wss-configuration directory via a Chrome or Firefox Web browser. The Mend Configuration Editor page is displayed.
Load the template JSON configuration file by clicking Choose File button and selecting the file located at wss-configuration/config/prop.json. The General tab appears in the Editor.
Click the General tab and enter the Activation Key which you copied in the previous section.
To display the Proxy tab, click the Advanced Properties checkbox on the Home tab. Proxy fields that are not mandatory (e.g., user name and password) must be left blank.
Click Export, and save the JSON file with the name prop.json. This file will be used in the next sections.
Notes:
You can export the JSON file at any time, even if you did not finish editing it in order to save your configurations and to enable assigning the configuration of a specific section to the appropriate professional in your organization (e.g., data source section may be assigned to the DBA of your organization).
When exporting the configuration file, it is important to give it the filename "prop.json".
In case of replacing the prop.json file with a new one, it is not enough to restart the controller and scanner pods. It is required to delete the old pods and run new ones.
If using the WS_ACTIVATION_KEY environment variable, the activation key did not require to be passed through the prop.json file.
Reference
Details on Attributes of the Configuration File
Section | Label | Name | Type | Mandatory | Description | Sample Value |
|---|---|---|---|---|---|---|
General | Activation Key | bolt.op.activation.key | String | yes | Your generated activation key in the Mend application | |
Proxy | HTTP Proxy Host | proxy.host | Host Address | no | HTTP proxy host. Leave blank to disable. Default value: Empty | |
Proxy | HTTP Proxy Port | proxy.port | Integer | no | HTTP proxy port. Leave blank to disable. Default value: Empty | |
Proxy | Proxy User | proxy.user | String | no | Proxy UserName (if applicable) | user |
Proxy | Proxy Password | proxy.password | String | no | Proxy Password (if applicable) | abc123 |
Proxy | Enable Proxy For All Traffic | proxy.for.all | Boolean | no | If set to NOTES:
| |
Advanced | Controller URL | controller.url | String | no | The ability to modify the App container URL in case its default name (wss-ghe-app) was modified. Default value: http://wss-ghe-app:5678 | |
Issues | Should Create Issues | bolt4scm.create.issues | Boolean | no | The ability to globally enable/disable Issues creation across all of your organization's repositories. Default value: true | |
Issues | Should Create Build Status | bolt4scm.create.check.runs | Boolean | no | The ability to globally enable/disable build statuses across all of your organization's repositories. Default value: true |
Next Steps after creating the Mend for GitHub Enterprise App
After you have successfully created the Mend for GitHub Enterprise App in your GitHub Enterprise environment, you are ready to build and deploy the Mend for GitHub Enterprise containers.

