User Steps on Build Machine
Prepare for Installation
Download the ‘tar.gz’ file (‘agent-4-bitbucket-<version>.tar.gz’) for Linux or 'zip' file Windows (‘agent-4-bitbucket-<version>.zip’)
Installation and Configuration
In Windows, extract ‘agent-4-bitbucket-<version>.zip’ to an empty folder. In Linux, extract ‘agent-4-bitbucket-<version>.tar.gz’ to an empty folder.
The extraction creates the following items:
-
‘wss-bb-add-on’: Includes the jar of the add-on that will be uploaded to your Bitbucket Data Center.
-
‘wss-bb-app’: Mend Bitbucket Data Center application. This application is responsible for communication between Mend application and Mend Bitbucket add-on. (located in the path 'wss-bb-app/docker/Dockerfile')
-
‘wss-config’: UI Configuration tool and related configuration file template.
-
'wss-deployment': Deployment template (for example, deploying the integration using Helm charts)
-
'wss-remediate': Mend Remediate worker
-
‘wss-scanner’: Mend BitBucket repository-scanner. wss-scanner is responsible for scanning Bitbucket repositories. (located in the path 'wss-scanner/docker/Dockerfile')
-
‘build.sh’/'build.bat’ (Linux/Windows): The build script
Modifying the Scanner Dockerfile
The wss-scanner image Dockerfile is located in the wss-scanner\docker\ folder. Some package managers are installed by default and the others will need to be manually uncommented in the Dockerfile in order to use them.
We also offer the Dockerfilefull that is located in the wss-scanner\docker\ folder. When using the wss-scanner image’s Dockerfilefull, all of the supported package managers are uncommented and installed by default.
See here for more information on which package managers are part of the scanner image as well as how to add additional package managers.
Python Support
If you want to specify the Python version for your repository, you can choose one of the following versions included in your scanner Dockerfile: 3.6.15, 2.7.18, 3.11.7, 3.12.3, 3.10.14, 3.7.17, 3.8.12, 3.9.18.
For this you will need to perform the following procedure:
-
Ensure the relevant Python version is uncommented in your scanner container’s Dockerfile.
-
Add or edit the .whitesource configuration file in your repository.
-
Use the
configModeparameter and set it to eitherLOCALorEXTERNAL. -
Create a whitesource.config file and add the following:
python.invokePipAsModule=true
python.path=python3.9
python.installVirtualenv=true
Note:
-
For
python.path, use one of the following values:2.7,3.6,3.7,3.8,3.9,or3.11. -
Alternatively, you can apply this globally across your repositories by using the Global Repo Configuration repo-config.json file.
Installing the Mend App in Bitbucket Data Center
There are two ways to install the Mend App in Bitbucket Data Center - by installing the app via the Atlassian marketplace for Bitbucket, or by uploading the JAR file directly from the extracted Mend for Bitbucket folder. For Bitbucket Data Center only the second option is available at the moment.
Installing via the Atlassian Marketplace
Navigate to the Administration page (<your/bitbucket-server/url>:<port>/admin) and then click Find new apps under the ADD-ONS menu.
-
In the search field, enter mend and press Enter. The WhiteSource (Mend) App is displayed.
-
Click Install.
Uploading the Mend App JAR file
Navigate to the Administration page (<your/bitbucket-server/url>:<port>/admin) and then click Manage apps under the ADD-ONS menu.
-
Click Upload app and select the JAR file located in the wss-bb-add-on folder.
-
Click Upload.
Note: Since Bitbucket 8.18.0 the option to upload apps via the UI/API is disabled.
To enable app installation with these two methods, in the bitbucket.properties file, set the property upm.plugin.upload.enabled=true
See Bitbucket documentation for more information
Creating a Bitbucket Mend user and generating a Mend Activation Key
Note: This step contains mild deviations between the Mend AppSec Platform and the Legacy SCA Application. The Legacy SCA instructions are available at the bottom of this section.
-
Navigate to the Users page under the ACCOUNTS menu (<your/bitbucket-server/url>:<port>/admin/users) and create a new user for Mend in your Bitbucket Data Center with a permission level “Bitbucket User”.
-
Log in to your Bitbucket Data Center with this Service user.
-
Login to the Mend Application.
-
Generate ‘activationKey’ in the Application by navigating to the 'Integrate' page. Expand the 'Mend for Bitbucket Data Center' bar to view the following fields:
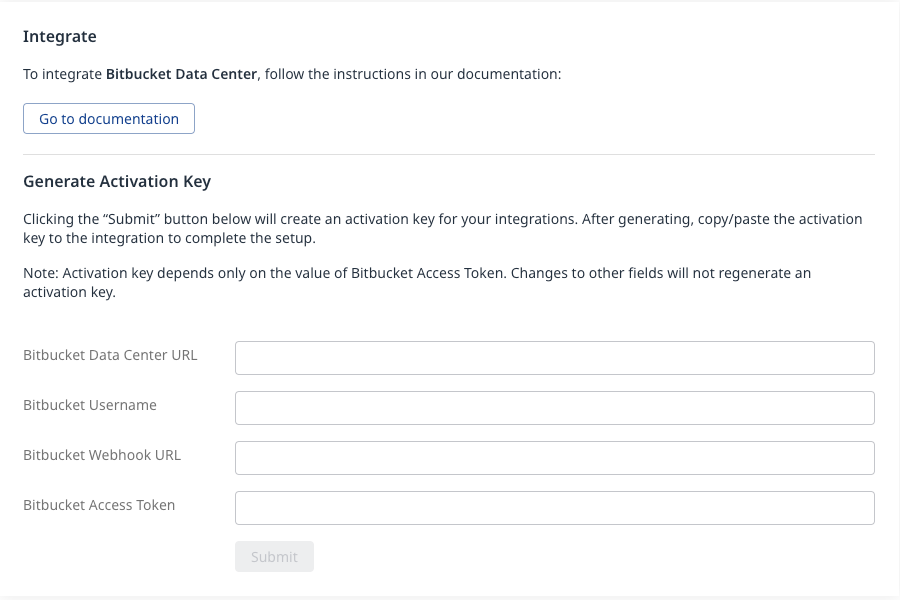
The displayed fields are the following:
-
Bitbucket Data Center URL: Your Bitbucket Data Center URL. For example: https://bitbucketdev.com.
-
Bitbucket Username: Your Bitbucket Service user’s username. Notice: it must be a username, please do not insert an email.
-
Bitbucket Webhook URL: Enter the webhook URL in the following format: http://<docker-wss-bb-app-destinationURL>:5678/payload.
-
Bitbucket Access Token:
For Bitbucket Data Center 9.X: Enter your Bitbucket service user’s password.
For Bitbucket Data Center versions before 9.X: Your Bitbucket Service user’s personal access token with maximum privileges for this user. See also an explanation about retrieving a personal access token in Bitbucket documentation. (Link in Bitbucket Data Center: <your/bitbucket-server/url>:<port>/plugins/servlet/access-tokens/users/<service-user-created-above>/manage). -
When clicking on ‘Submit’, your activation key will be generated. A new Service user will also be created for this integration inside the Mend Application with a WS prefix. NOTE: Do not remove this Service user.
Creating a Bitbucket Mend user and generating a Mend Activation Key (Legacy SCA Application)
-
Navigate to the Users page under the ACCOUNTS menu (<your/bitbucket-server/url>:<port>/admin/users) and create a new user for Mend in your Bitbucket Data Center with a permission level “Bitbucket User”.
-
Log in to your Bitbucket Data Center with this Service user.
-
Login to the Mend Application.
-
Generate ‘activationKey’ in the Application by navigating to the 'Integrate' page. Expand the 'Mend for Bitbucket Data Center' bar to view the following fields:
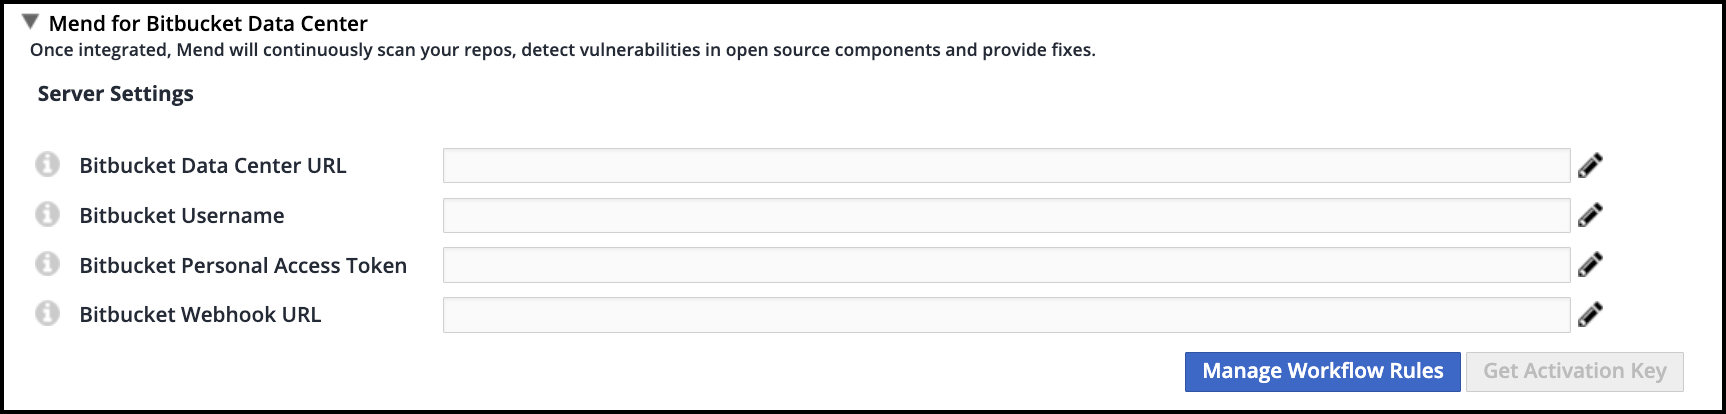
The displayed fields are the following:
-
Bitbucket Data Center URL: Your Bitbucket Data Center URL. For example: https://bitbucketdev.com.
-
Bitbucket Username: Your Bitbucket Service user’s username. Notice: it must be a username, please do not insert an email.
-
Bitbucket Personal Access Token: Your Bitbucket Service user’s personal access token with maximum privileges for this user. See also an explanation about retrieving a personal access token in Bitbucket documentation. (Link in Bitbucket Data Center: <your/bitbucket-server/url>:<port>/plugins/servlet/access-tokens/users/<service-user-created-above>/manage).
-
Bitbucket Webhook URL: Enter the webhook URL in the following format: http://<docker-wss-bb-app-destinationURL>:5678/payload.
-
When clicking on ‘Get Activation Key’, your activation key will be generated. A new Service user will also be created for this integration inside the Mend Application with a WS prefix. NOTE: Do not remove this Service user.
Supported Dependency Files
The following dependency files are supported for Mend for Bitbucket Data Center and Data Center SCA scans:
-
bower.json
-
build.gradle
-
build.gradle.kts
-
build.sbt
-
conanfile.py
-
conanfile.txt
-
cargo.toml
-
composer.json
-
dependencies.scala
-
environment.yml
-
Gemfile.lock
-
glide.lock
-
go.mod
-
Godeps.lock
-
gogradle.lock
-
Gopkg.lock
-
gradle.lockfile
-
gradle.properties
-
libs.gradle
-
libs.versions.toml
-
package-lock.json
-
package.json
-
paket.dependencies
-
packages.config
-
packages.lock.json
-
packrat.lock
-
Pipfile
-
pipfile.lock
-
pnpm-lock.yaml
-
Podfile
-
poetry.lock
-
pom.xml
-
pubspec.yaml
-
pyproject.toml
-
requirements.txt
-
settings.gradle
-
setup.cfg
-
setup.py
-
vendor.conf
-
versions.kt
-
yarn.lock
-
Any metafile with one of the following extensions:
-
asp
-
aspx
-
config
-
csproj
-
do
-
gitmodules
-
htm
-
html
-
jsp
-
shtml
-
tf
-
xhtml
-
-
Cargo.lock
Running the UI configuration tool from the ‘wss-configuration’ Directory
This editor enables you to configure the deployment file according to your specific configuration requirements.
-
Use the editor by opening the file index.html in 'wss-configuration' directory via a Chrome or Firefox Web browser. The ‘Mend Configuration Editor’ page is then displayed:
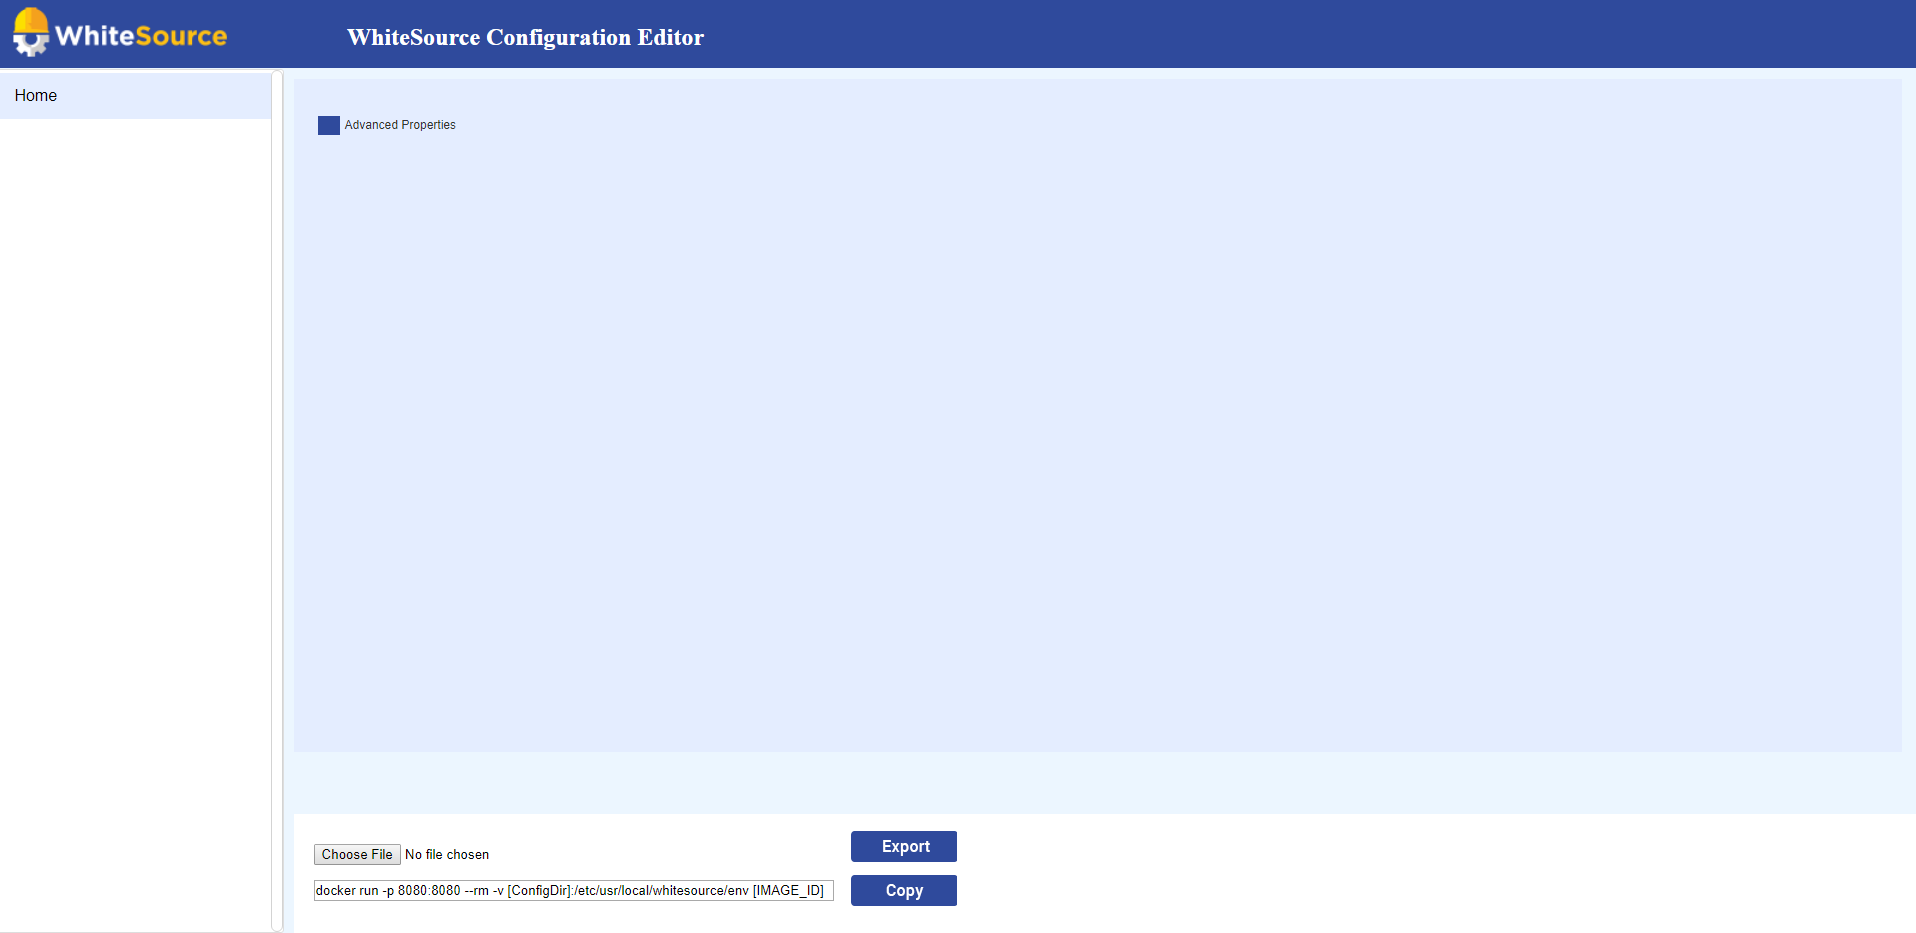
-
Load the template JSON configuration file by clicking the Choose File button and selecting the file located at config/prop.json. The editor page then changes its display to the following:
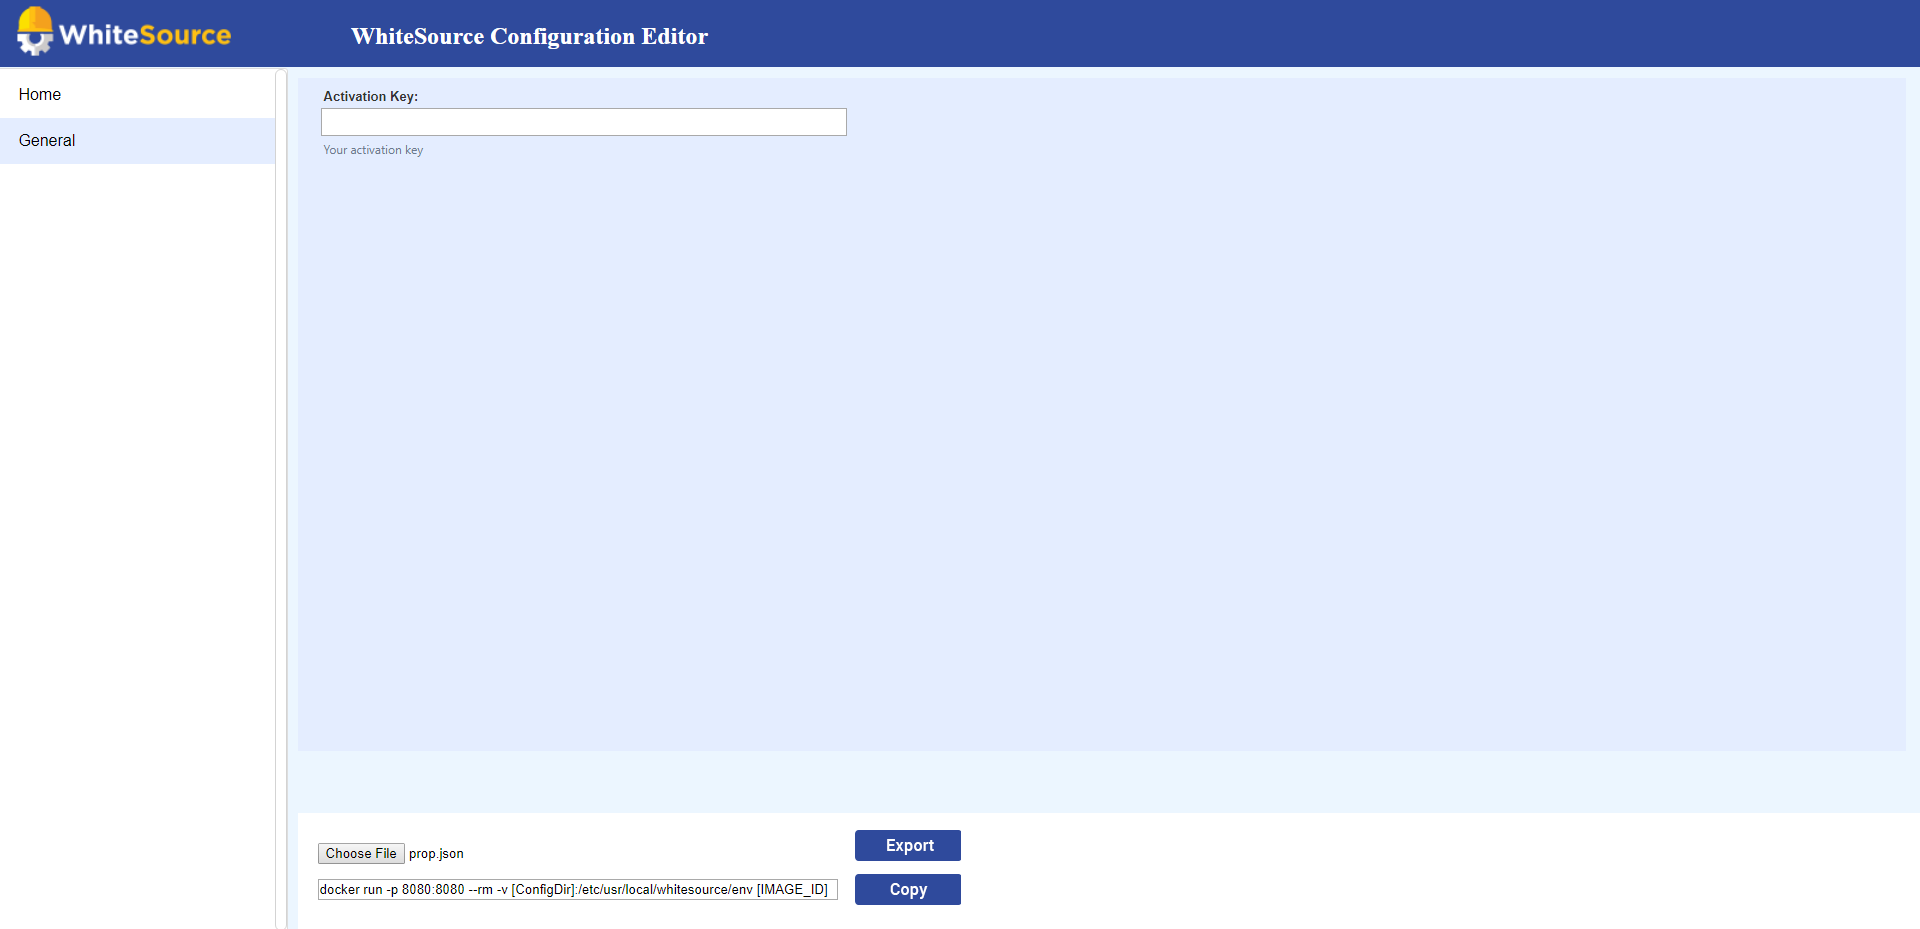
On the left pane of the editor the different sections of the configuration are displayed. The main pane of the editor enables you to add/edit values to relevant parameters for the selected section. Note that many of the parameters already include default values.
Please copy the Activation key that was generated in Mend application and paste it to 'Activation Key' property in the editor.
-
In order to configure the proxy settings, select the 'advanced properties' checkbox. Proxy fields that are not mandatory (e.g., user name and password) should be left blank.
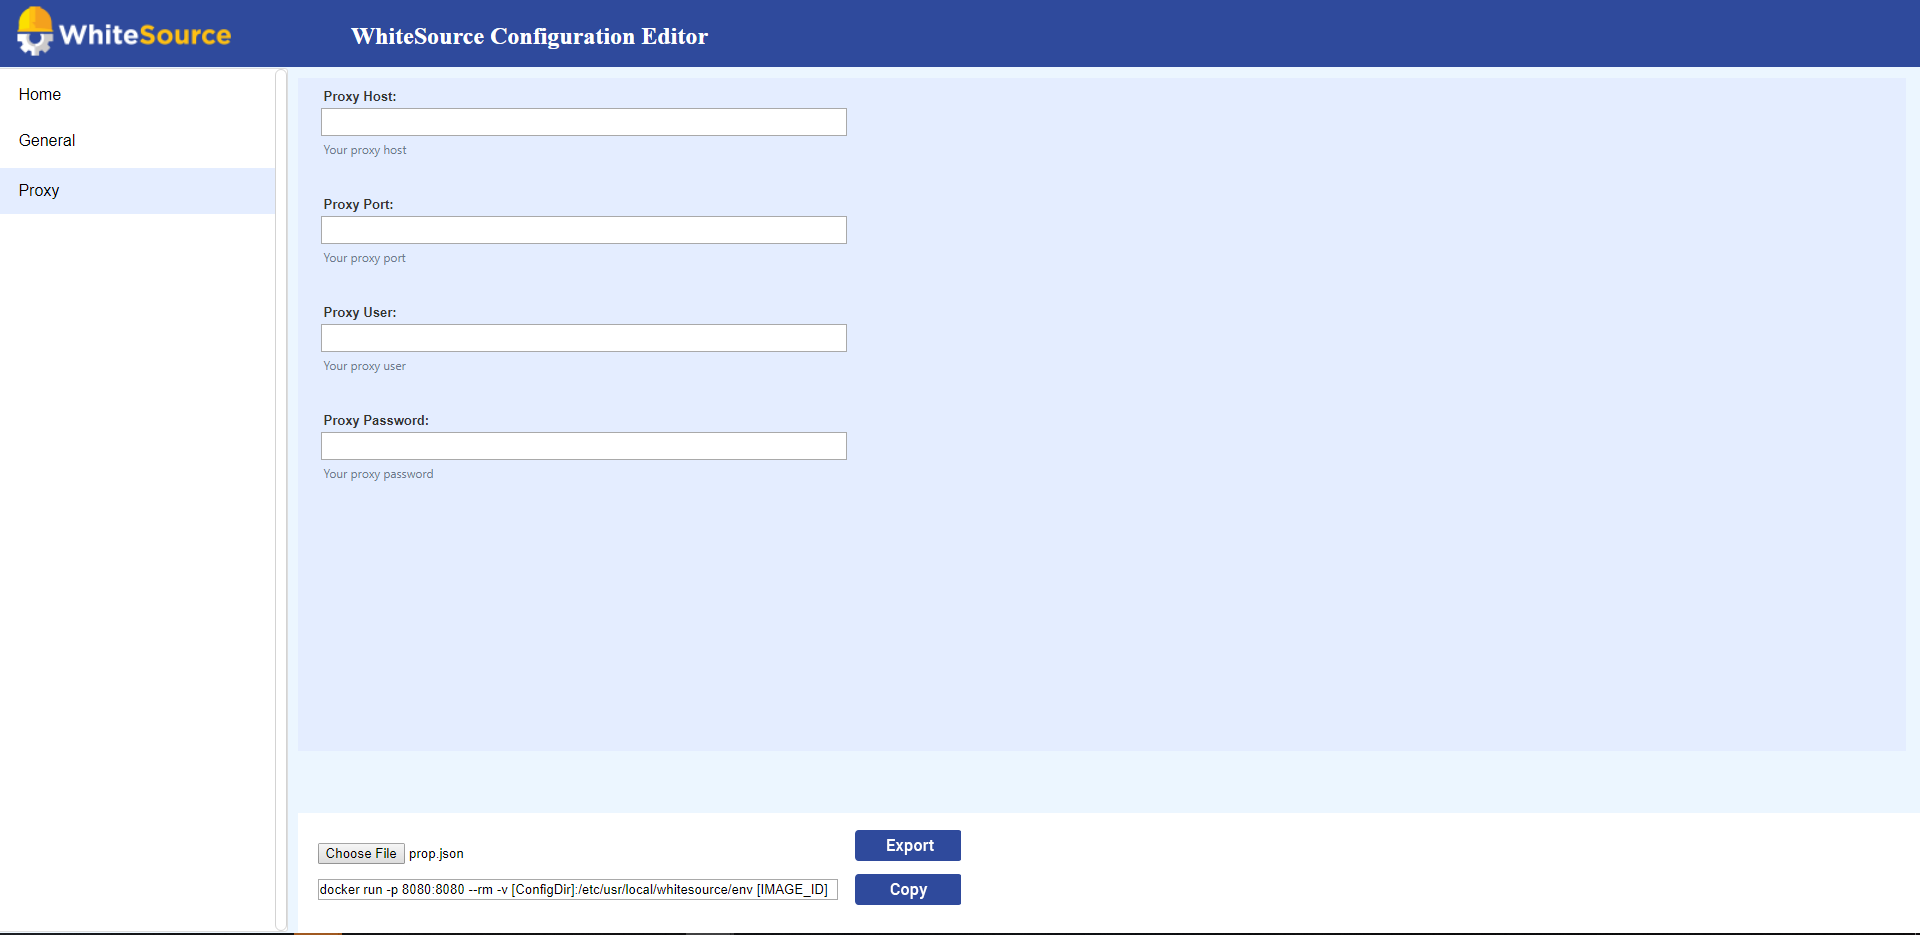
-
After you have finished editing, export the filled in configuration file by clicking the ‘Export’ button and saving the JSON file with the name prop.json in a different location. This file will be used when running the application.
Details on Attributes of the Configuration file
|
Section |
Label |
Name |
Type |
Mandatory |
Description |
Sample Value |
|---|---|---|---|---|---|---|
|
General |
Activation Key |
bolt.op.activation.key |
String |
yes |
Your generated activation key in the Mend application |
|
|
Proxy |
HTTP Proxy Host |
proxy.host |
Host Address |
no |
HTTP proxy host. Leave blank to disable. Default value: Empty |
|
|
Proxy |
HTTP Proxy Host |
proxy.port |
Integer |
no |
HTTP proxy port. Leave blank to disable. Default value: Empty |
|
|
Proxy |
Proxy User |
proxy.user |
String |
no |
Proxy UserName (if applicable) |
user |
|
Proxy |
Proxy Password |
proxy.password |
String |
no |
Proxy Password (if applicable) |
abc123 |
|
Proxy |
Enable Proxy For All Traffic |
proxy.for.all |
Boolean |
no |
If set to NOTES:
|
|
|
Advanced |
Controller URL |
controller.url |
String |
no |
The ability to modify the App container URL in case its default name (wss-bb-app) was modified. Default value: http://wss-bb-app:5678 |
|
|
Issues |
Should Create Issues |
bolt4scm.create.issues |
Boolean |
no |
The ability to globally enable/disable Issues creation across all of your organization's repositories. Default value: true (NOTE: Supported from version 20.5.1.3 only) |
|
|
Issues |
Should Create Build Status |
bolt4scm.create.check.runs |
Boolean |
no |
The ability to globally enable/disable build statuses across all of your organization's repositories. Default value: true (NOTE: Supported from version 20.5.1.3 only) |
|
You can export the JSON file at any time, even if you did not finish editing it in order to save your configurations and to enable assigning the configuration of a specific section to the appropriate professional in your organization (e.g., datasource section may be assigned to the DBA of your organization).
In case of replacing the prop.json file with a new one, it is not enough to restart the controller and scanner pods. It is required to delete the old pods and run new ones.
See also the ‘Configuring Deployment Settings’ section in this document.
Optional step: If you want to pull the images from another machine and run them as a container, push them to your Docker registry.