Overview
The Mend AppSec Platform’s Source File Matching automatically consolidates source files detected in SCA scans into logical libraries, referred to as Source Libraries. The source libraries often represent the repositories on GitHub from which the source files are obtained by the developers.
The detected source files, alongside their source libraries, are all listed in the Source Files table, facilitating Legal Counsels' license attribution audits and helping to ensure continuous legal compliance.
Use-case
The same source files can and often reside in multiple public repositories simultaneously, each with a potentially different license. Mend.io’s source file matching feature applies different techniques to associate source files with the most probable source library, while giving Legal Counsels the ability to override the original match and avoid unwanted licenses in the open-source inventory.
The Source Files Table
The following columns provide information about each source file detected in your project or application:
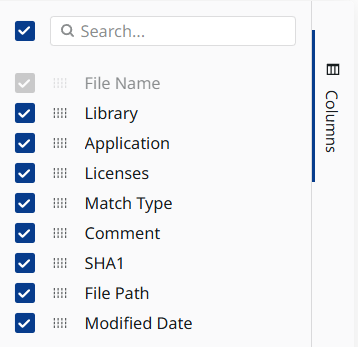
You can add/remove columns via the Columns drawer on the right.
File Name - The name of the detected source file.
Library - The logical library Mend.io’s Source File matching algorithm associated the source file with.
Licenses - The logical library’s license.
Match Type - The match type used to associate the source file with the logical library:
-
Auto - Indicates the association was done by the matching algorithm during an SCA scan.
-
Manual - Indicates the association was performed by a user, overriding the automatic association.
Comment - Indicates whether a comment was left by a user on a manually matched source file.
-
If no comment exists, allows the user to add one.
-
A comment left at the org level will block the option to add it at the application level.
SHA1 - The SHA1 value of the detected source file.
File Path - The source file’s location on the scanned file system.
Modified Date - The date of the last user-initiated remapping. If inapplicable, the field will be empty.

Note:
-
Sorting and filtering are supported for all columns.
-
Use the Export to CSV button in the upper right corner to export the table data. Filters applied in the UI apply to the exported data as well.
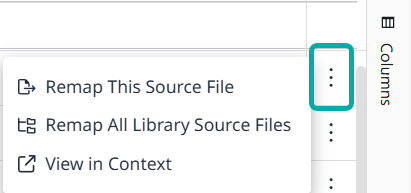
Actions
Each source file’s Actions menu is available on the far-right and allows you to perform the following actions:
-
Remap This Source File - Associate the selected source file with a different source library.
-
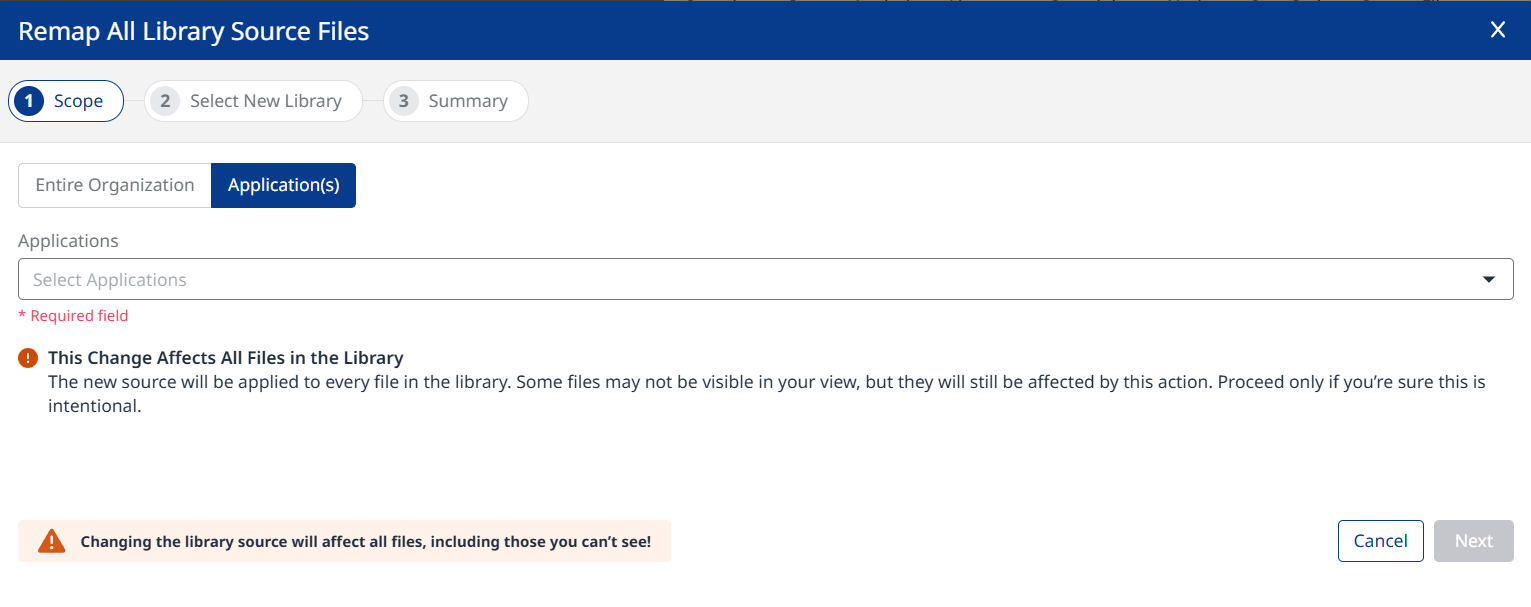
Remap All Library Source Files - Associate all source files currently associated with the selected source file’s source library with a different source library.
Note: This action is independent of your selection in the table and automatically includes all source files associated with the current source library, including files you might not see in the current scope. This is especially relevant when you’re opting to remap at the organization level, since this scope cannot be represented in the table. -
View in Context - View the selected source file’s source library’s complete list of source files.
Remapping Source Files in the UI
Note:
-
Users with Org Admin roles can perform remapping at both the organization and application levels. Users with Application Admin roles can perform remapping within the applications they manage.
-
Remapping is not supported in Project scopes.
-
Remapping is irreversible. Restoring default source file associations can only be done as a subsequent manual remapping effort.
Selecting one of the remap actions will spawn the Remap Source Files wizard.
Step 1 - Scope
Select the scope for which to remap the source file(s), either the entire organization or specific applications:

Step 2 - Select New Library
After the scope is selected, you will get suggestions for alternative source libraries from the Mend AppSec Platform.
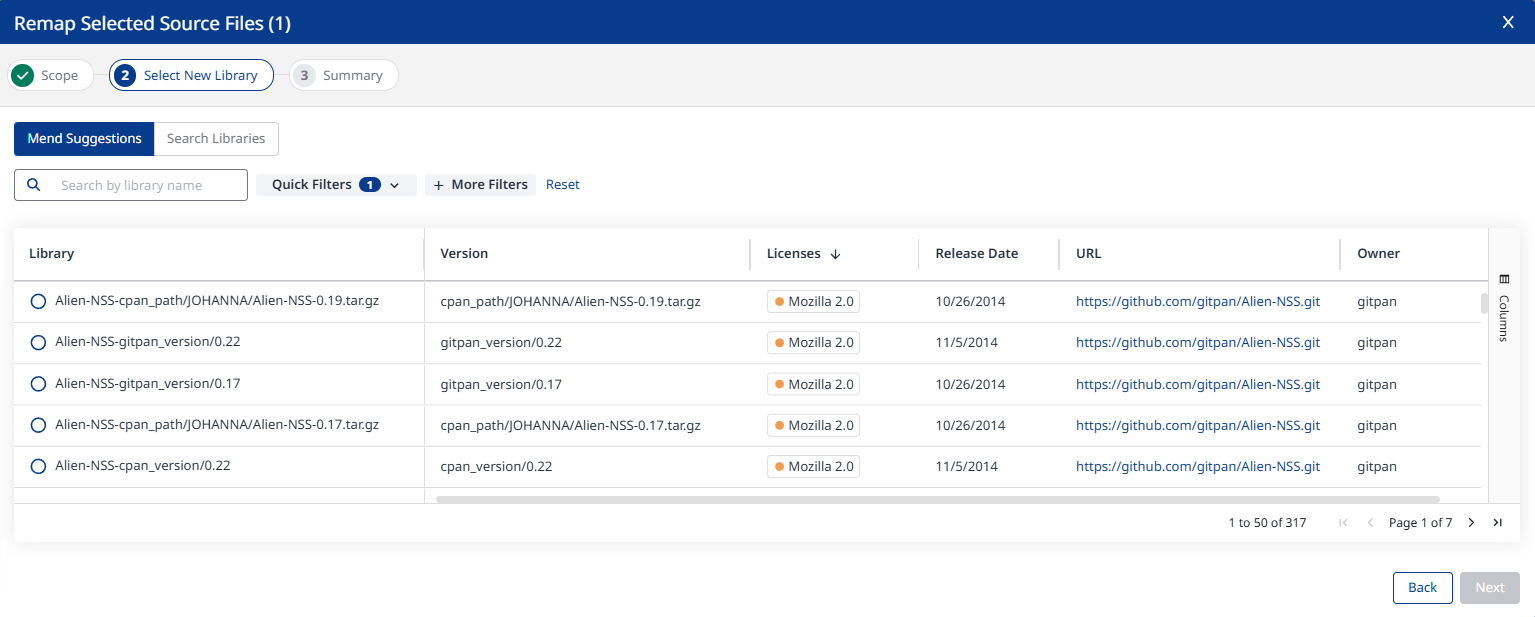
The Mend Suggestions Tab
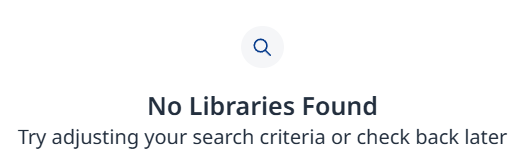
By default, source libraries will only be suggested if all of the selected source files actually exist in them, based on SHA1 matches. This means that even if a single source file in your selection originates from an unrelated source library, it will result in a No Libraries Found message, indicating there are no matches for libraries containing all of the selected source files.
This can be changed using Quick Filters by unchecking “Show only repos matching all source files”. The quick filters also give you the option to list non-official releases.
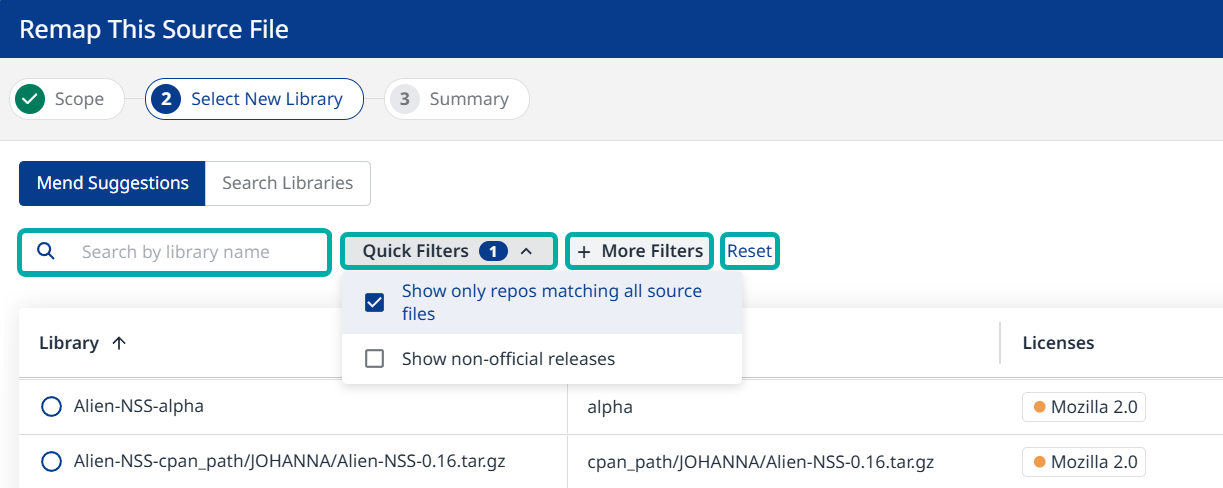
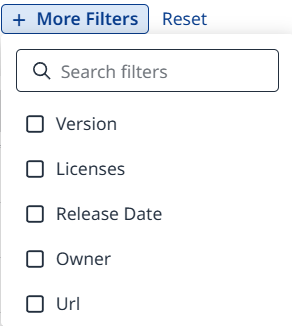
You can make finding an alternative source library quicker by searching by library name. Use the More Filters menu for a more advanced search experience.
If the actual source library from which the source files were obtained isn't listed, you are given the option to search for it manually by switching from Mend Suggestions to the Search Libraries tab.
At any point, click the Reset button on the right to clear applied filters and search values.
The Search Libraries Tab
In the Search Libraries tab you can freely search for a potential source library to associate your source files with, by library name.
Note that you must type at least 3 characters to trigger the search. Alternatively, use More Filters.
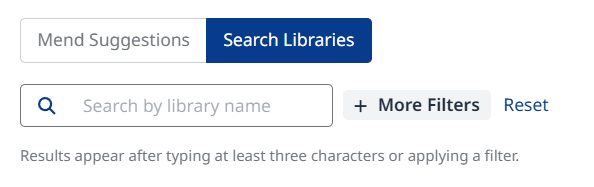
At any point, click the Reset button on the right to clear applied filters and search values.
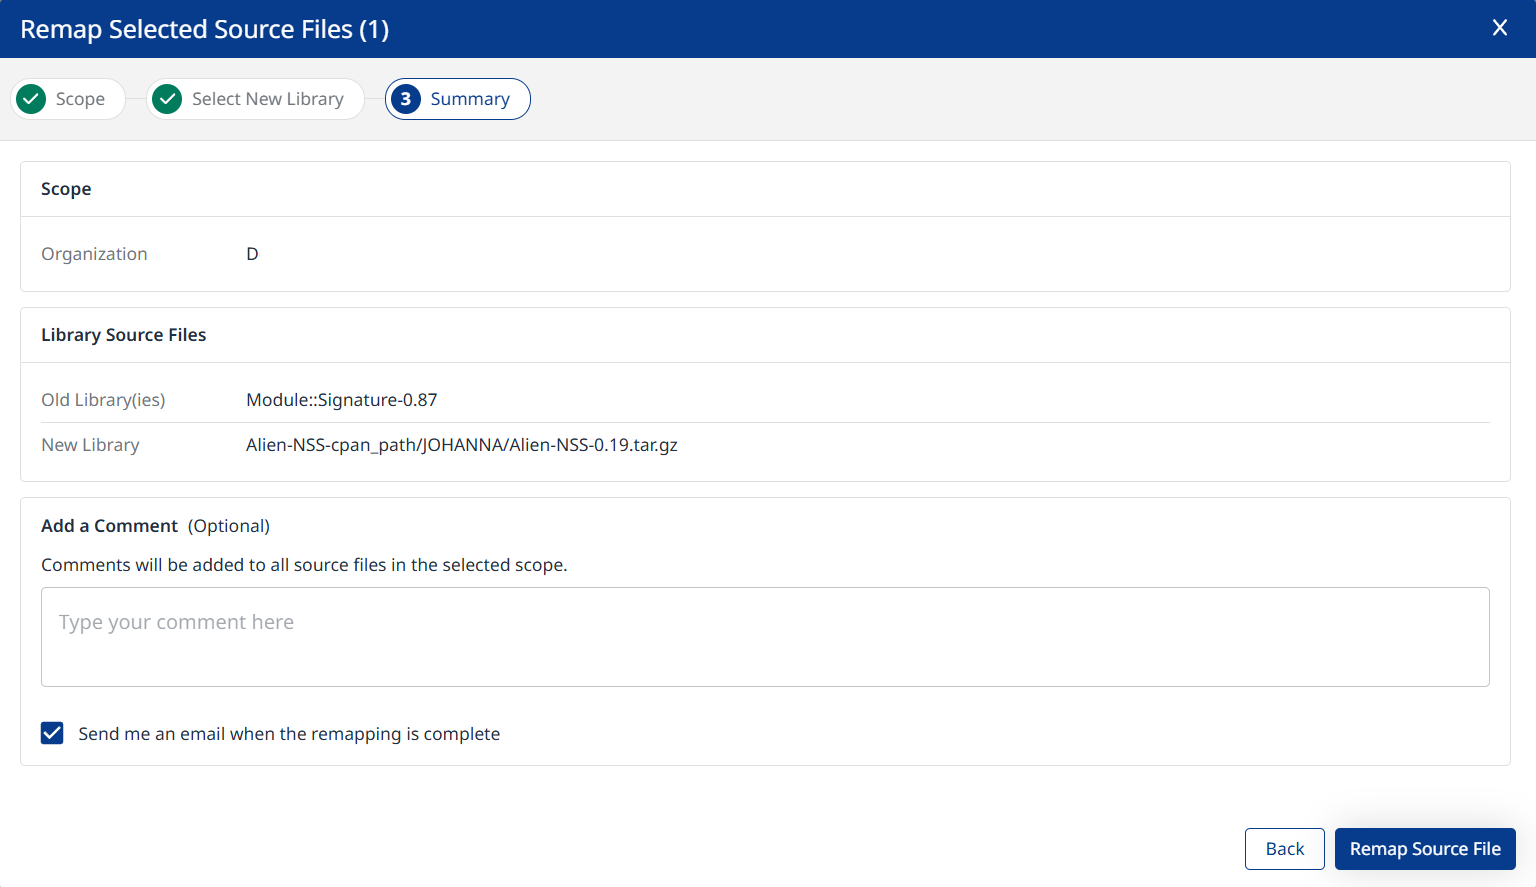
Step 3 - Summary
After a new source library is selected, the wizard will display the summary of the choices made in the previous steps, and will also allow you to add a comment.
Check the “Send me an email” box to get notified when remapping is complete.
Note: The email contains a link, directing users to log into the Legacy SCA application rather than the Mend AppSec Platform. This gap is planned to be addressed in a future release.
Click Remap Source File(s) at the bottom right to confirm.
Managing Unmatched Source Files
Some of the source files in your inventory might not be open-source and will therefore be automatically excluded from the scan results displayed in the platform UI or listed in the dependency reports. You have the option to include those files and display them as Unmatched Source Files in your inventory in the UI, allowing for full visibility into all components identified during your scans.
-
As an organization administrator, go to Administration → Dependencies
-
Change the setting of Manage Unmatched Source Files to Enabled.
-
Click Apply. Note that this change is at the organization level.
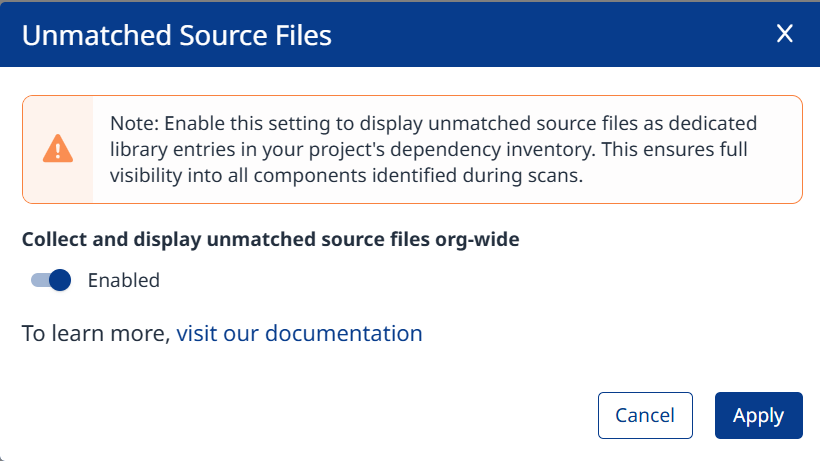
When enabled, source files that could not be matched to a known open-source library will be displayed in the project inventory under a dedicated unmatched files bucket. This bucket will appear in the project inventory as a synthetic library with the following naming convention:
<ProjectName> Unmatched Source Files.
Disabling Unmatched Source Files after data has been collected: Previously stored unmatched files remain visible — no destructive action on toggle-off. New scans stop populating the Unmatched Source Files bucket.
Note: Unmatched source files will be presented in the Source Files table but not in your organization's inventory report. You can always change the library of an unmatched file, and assign its license and copyrights.
Additional Tables
Source Files and Source Libraries are listed in a few more locations in the Mend AppSec Platform UI, as explained below.
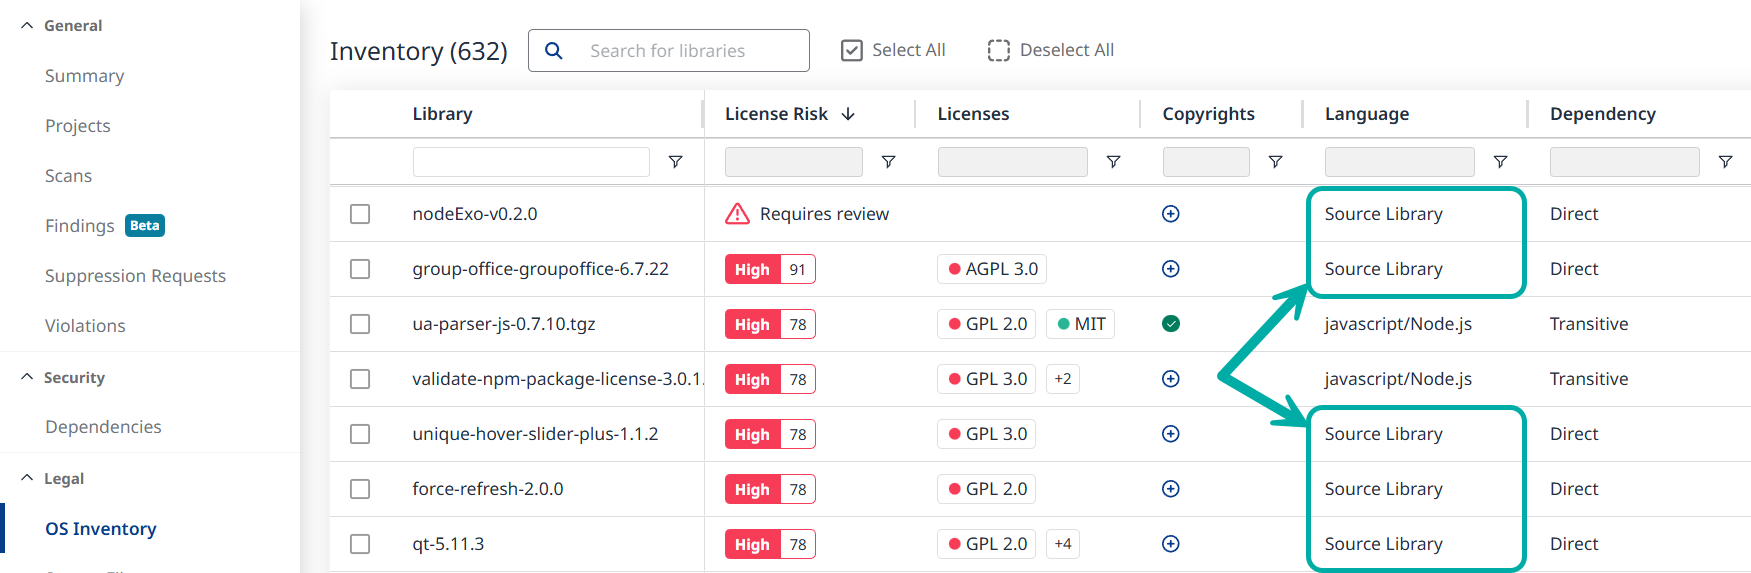
The OS Inventory Table
In the context of an application or a project, select “OS Inventory” on the left-pane menu.
A source library will be indicated by the “Source Library” value in the Language column.
Reminder: A source library is a logical library automatically selected by the source file matching algorithm upon detecting a source file or a group of source files during a scan.
To view the source files associated with the source library, click the desired row. This will spawn the library side-panel.
Navigate to the Source Files tab to view the source files associated with the source library.

Here you have two remapping options:
-
Remap Selected Source Files - This button at the top-right becomes available upon selecting one or more source files to remap.
-
Remap All Library Source Files - This button at the top (below the library name) is independent of your selection in the table and automatically includes all source files associated with the current source library, including files you might not see in the current scope. This is especially relevant when you’re opting to remap at the organization level, since this scope cannot be represented in the table.
Note: Only users with Admin roles can perform change operations.
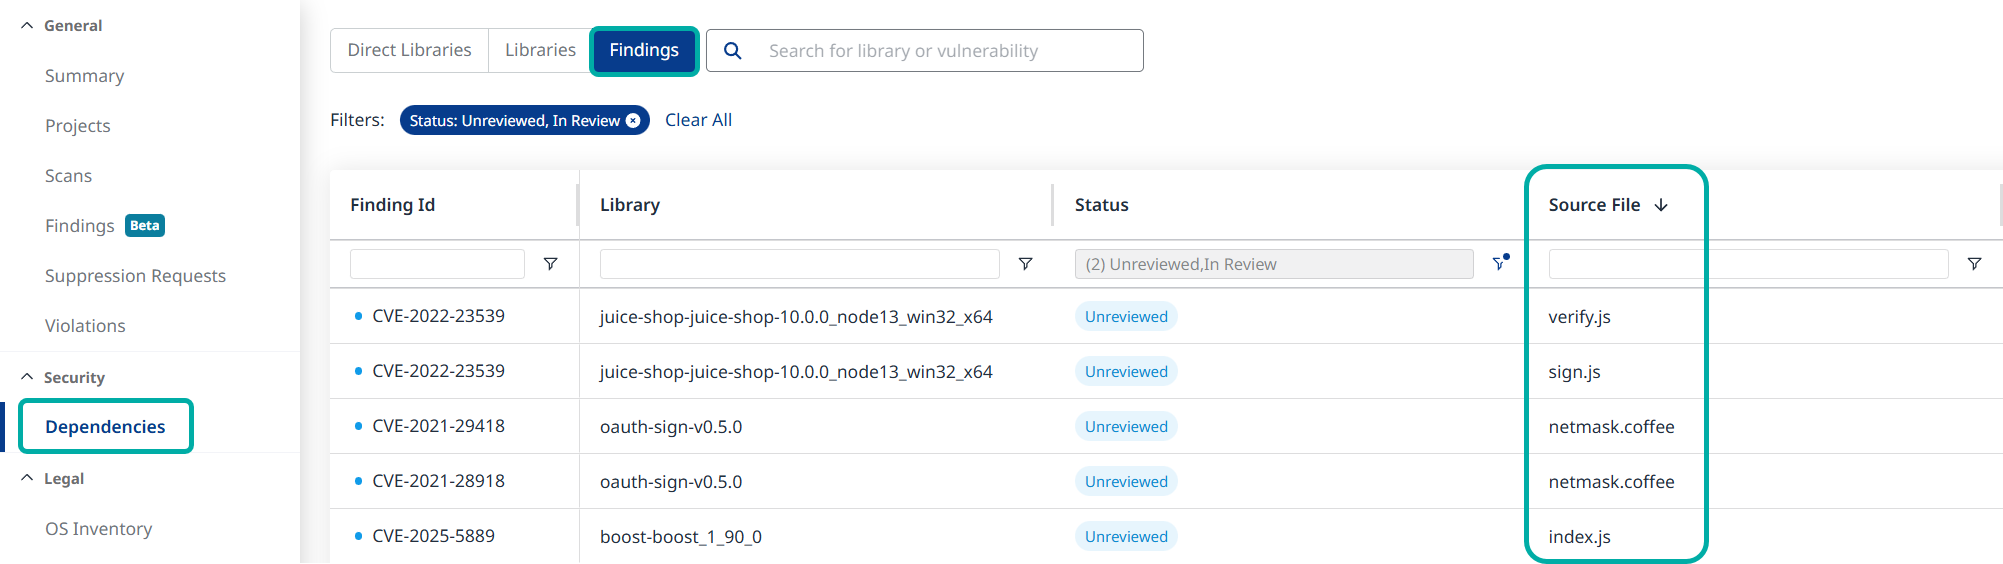
The Findings Table
Source libraries and files are also listed in the Findings table.
-
Navigate to Dependencies → Findings.
-
Add the Source File column via the Columns drawer on the right if it’s not already displayed.
-
Sorting and filtering are both supported.
Remapping Source Files - API
Note:
-
Only users with Admin roles can perform change operations.
-
Remapping is not supported in Project scopes.
-
Remapping is irreversible. Restoring default source file associations can only be done as part of a subsequent manual remapping effort.
-
Click here for the full API documentation.
Step 1 - Review your Source File Inventory
This API is available for applications and projects:
-
GET /api/v3.0/applications/{applicationUuid}/dependencies/sourceFiles/inventory
-
GET /api/v3.0/projects/{projectUuid}/dependencies/sourceFiles/inventory
Note: Each source file in the inventory response will be accompanied by auuid, which you need to specify for the next API endpoint (matchSuggestions).
Response Excerpt Example:"response": [ { "uuid": "4afaf570-9632-417e-b6a8-6b0f21d70ab3", "name": "adler32.c", "matchType": "MANUAL", "sha1": "111795e0dc4713027b916d3cd610f92a8f33d98", "localPath": "/mnt/scratch/workspaces/workspace/zlib/adler32.c", "lastModified": "2025-11-26T10:41:32Z", "library": { "uuid": "0682aaa0-07b8-48e1-934a-aed003a5e459", "name": "cmocka-cmocka-1.1.3", "licenses": [ { "uuid": "ce9af9d6-c754-4221-9546-b5003a282979", "name": "Apache 2.0", "suspected": false, "osiApproved": false, "profile": { "copyrightRiskScore": { "riskScore": 39 } } } ] } } ]
Recommended: After reviewing the inventory and selecting source files to remap, use the matchSuggestions API to obtain a list of source libraries to remap the source files to.
Alternatively, users can search for a match themselves using the searchForMatch API. matchSuggestions is superior, however, because it only lists source libraries that actually contain the source files, by SHA1 matches. With searchForMatch, users can choose any library which matches the search criteria, including ones that are completely irrelevant.
Step 2 - Review Match Suggestions
-
POST /api/v3.0/applications/{applicationUuid}/dependencies/sourceFiles/matchSuggestions
-
POST /api/v3.0/projects/{projectUuid}/dependencies/sourceFiles/matchSuggestions
Note: Each suggestion will be accompanied by amatchSuggestionId, which you need to specify for the remapping API endpoint. The number of suggestions is limited to 1000.
Response Excerpt Example:"response": [ { "name": "mongo-r4.4.21-rc0", "sha1": "07fb62484a27e3e464ecdd6c746de64e53e19e56", "licenses": [], "version": "r4.4.21-rc0", "owner": "mongodb", "url": "https://github.com/mongodb/mongo.git", "date": "2023-04-14T13:51:42Z", "nonOfficialRelease": false, "matchSuggestionId": "ZDG5YmNmYjItYjY2ZS00OGZmLThiZWYtNTEwMWEzZjNkZTQy" }]
Manually Search for Matches
Users who prefer to manually search for a source library instead of relying on matchSuggestions can do it using this API.
-
GET /api/v3.0/applications/{applicationUuid}/dependencies/sourceFiles/searchForMatch
-
GET /api/v3.0/projects/{projectUuid}/dependencies/sourceFiles/searchForMatch
Note: Each library in the response will be accompanied by auuid, which you need to specify for the remapping API endpoint.
Response Excerpt Example:"response": [ { "uuid": "306ea594-8cb5-4c74-8e94-5e7273915745", "name": "netmask-master_2015-05-07", "licenses": [], "version": "master_2015-05-07", "owner": "JamesCollerton", "url": "https://api.github.com/repos/JamesCollerton/Assessed_Work_DEPRECIATED", "date": "2015-05-07T18:43:22Z" }]
Step 3 - Remap your Source Files
When you are ready to remap, use one of the APIs below, depending on the desired scope. Note that depending on the API used in the previous step, matchSuggestions vs. searchForMatch, you will be required to provide either the matchSuggestionId or the desired source library’s uuid, respectively.
To avoid confusion, the scope in which the remapping takes effect is defined in this step; it is not affected by scopes used in previous steps. Example: You may use the inventory API in the scope of one of your projects, however selected source files will be remapped across selected applications or the entire organization, which are more expansive scopes than the project inventory in Step 1.
-
Application-level or multi-application remapping
POST/api/v3.0/orgs/{orgUuid}/applications/dependencies/sourceFiles/remapping
Remaps the specified source files (sourceFileUuids) to the specified source library (matchSuggestionId/targetLibraryUuid) across specified applications (applicationUuids).
Example payload:{ "applicationUuids": ["string", ...], "matchSuggestionId": "string", "sourceFileUuids": [ "sourceFile1_Uuid", "sourceFile2_Uuid",... ], "comment": "string" "sendEmailNotification": "true" } -
Organization-level remapping
POST/api/v3.0/orgs/{orgUuid}/dependencies/sourceFiles/remapping
Remaps the specified source files (sourceFileUuids) to the specified source library (matchSuggestionId/targetLibraryUuid) across the entire organization.
Example payload:{ "targetLibraryUuid": "string", "sourceFileUuids": [ "sourceFile1_Uuid", "sourceFile2_Uuid",... ], "comment": "string" "sendEmailNotification": "false" }
Email Notification
The remapping APIs initiate asynchronous source file remapping jobs. When sendEmailNotification is set to true, the system sends a notification email to the initiating user once the remapping is complete.