Skip table of contents

Kubernetes Integrations in Mend Container

Overview

This feature offers agentless scanning of Container Images from Kubernetes Clusters to indicate which images are deployed and on which resources and environments.

Getting it done

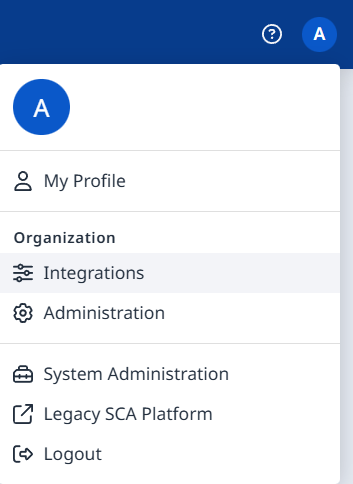
  1. Navigate to the organization’s Integrations page (image-20240320-070405.png → Integrations):

    image-20240320-070648.png
  2. Click on a logo to create a new integration:

    image-20250709-080920.png

Amazon EKS

The Mend Kubernetes (K8s) integration can connect with your Amazon EKS service using your provided access and secret keys.

Prerequisites before you Configure Mend’s Kubernetes Integration for Amazon EKS

  • Your Mend user must be an organization administrator.

  • Your Amazon EKS role that owns the access and secret keys provided to Mend for authentication must have an IAM policy attached with the necessary actions for all relevant K8s clusters. See the Amazon EKS setup for Mend K8s integration access section of this document for instructions.

  • AWS PrivateLink or CIDRs for public access are not supported.

  • Private-only EKS clusters are not supported.

Amazon EKS Setup for Mend K8s Integration Access

  1. Create/Edit an AWS user with the following IAM policy that includes these policy permissions:

    CODE
    {
        "Version": "2012-10-17",
        "Statement": [
            {
                "Effect": "Allow",
                "Action": [
                    "eks:ListTagsForResource",
                    "eks:AccessKubernetesApi",
                    "eks:DescribeCluster",
                    "eks:ListClusters"
                ],
                "Resource": "arn:aws:eks:<REGION>:<ACCOUNT_ID>:cluster/*"
            }
        ]
    }

Mend Tip: If you are scanning images from your private ECR, make sure to include the permissions needed for Mend to integrate with your private registries: Configure your private Amazon Elastic Container Registry (ECR) with Mend. Also, here are additional reading sources from AWS:

  1. Create access and secret keys for this user via the Security Credentials tab → Access keys section within AWS. Keep the access and secret keys on hand for the integration steps later on within the Mend Application. For assistance within AWS, read here: Managing access keys (console).

  2. Apply Mend’s Cluster Role provided below to each of the clusters you wish to integrate. This step allows Mend access to the clusters to obtain the list of running images. In the mend-readonly-group.yaml YAML file example below, we use readonly-group as the value for the group name:

CODE
apiVersion: rbac.authorization.k8s.io/v1
kind: ClusterRole
metadata:
  name: readonly-clusterrole
rules:
- apiGroups: ["*"]
  resources: ["*"]
  verbs: ["get", "watch", "list"]
---
apiVersion: rbac.authorization.k8s.io/v1
kind: ClusterRoleBinding
metadata:
  name: readonly-binding
roleRef:
  apiGroup: rbac.authorization.k8s.io
  kind: ClusterRole
  name: readonly-clusterrole
subjects:
- kind: Group
  name: readonly-group
  apiGroup: rbac.authorization.k8s.io

"*" can be replaced with a specific list of resources, based on your needs.

Mend Tip: You can apply the YAML file above with kubectl via the following command:
kubectl apply -f mend-readonly-group.yaml. Also, here are additional reading sources from AWS:

  1. Within the ConfigMap, add your AWS user (from step one) and its ARN under the mapUsers section:

    1. Open the ConfigMap (i.e via the kubectl command: kubectl edit configmap aws-auth -n kube-system)

    2. Using our readonly-group example from step three, add to the mapUsers section (or create a mapUsers section, if needed) the following:

      CODE
      mapUsers: |
          - groups:
            - readonly-group
            userarn: <USER_ARN>
            username: <USERNAME>
  2. Save your changes and exit out of the files. You are now ready to configure the integration within the Mend Application.

Set up the Mend Kubernetes Integration for Amazon EKS in the Mend Platform UI

image-20250709-084047.png
Step 1 - General Details
  1. Fill in the desired Display Name (mandatory).

  2. Add a Description (optional).

  3. Select the Environment (Production/Dev/QA/Staging). (Mandatory; multi-selection is supported).

    image-20240320-073237.png
Step 2 - Authentication

Fill in the Region, Access Key and Secret Key of your Amazon EKS:

image-20250709-083738.png

Once configured, use the Test Connection button to verify connectivity. Once verified, you can proceed to the next step.

Step 3 - Clusters

The summary of detected clusters will be displayed. Click Next to proceed to the next step.

image-20250714-160644.png
Step 4 - Configuration

Fill in the Configuration information to define your scan schedule:

image-20250714-134143.png
  • Enable Schedule - Toggle off to disable scheduling.

  • Scan Time

  • Frequency

  • Scan on Connect - While toggled on, it means a scan will be triggered automatically once the integration setup is completed.

Scheduling image registry scans is crucial for maintaining the security and integrity of your container images. By default, a scan interval of 7 days will be applied. You can change the scan interval in 1-day increments or select specific days of the week when you wish for scans to be executed.

Note: After the first scan (in which the latest 10 tags are scanned), in every scheduled scan only newly pushed images from the registry or changed images will be scanned. This is because vulnerability and package updates occur automatically in an asynchronous manner, keeping the security information up-to-date without requiring new scans.

Click the Next (image-20240727-113029.png) button at the bottom right to move on to the next step.

Step 5 - Summary

In this step, the summary of your input from the previous steps will be displayed. You can go back to the previous screens of the wizard to make changes, by clicking the ‘Back’ button at the bottom right corner of the screen. If you wish to confirm your configuration and add your registry, click the ‘Done’ button:

image-20240727-114442.png

A Registry Added Successfully message will pop-up at the bottom-left corner of the user interface once the integration credentials and configuration have been verified:

image-20240328-191507.png

Reference

Mend Kubernetes Integration - Amazon EKS Parameters

Parameter

Description

Display Name

The name of your K8s integration. This will be displayed in the Integrations dashboard → Kubernetes tab.

Description

Optional. Provide any text. We recommend providing information that will help you remember the integration.

Region

Select the AWS region where your Amazon EKS is hosted. The region options are:

  • us-east-(1-2)

  • us-west-(1-2)

  • af-south-1

  • ap-east-1

  • ap-south-1

  • ap-northeast-(1-3)

  • ap-southeast-(1-2)

  • ca-central-1

  • eu-central-1

  • eu-west-(1-3)

  • eu-south-1

  • eu-north-1

  • me-south-1

  • sa-east-1

Environments

Select the type of environment of your Amazon EKS (multiple options can be selected). The environment options are:

  • Production

  • Dev

  • QA

  • Staging

Access method

The method to authenticate Mend with your Amazon EKS environment. The available options are:

  • Access Key & Secret Key

Access Key

Provide your user access key for your EKS environment

Secret Key

Provide your user secret key for your EKS environment.

Native K8s

The Mend Kubernetes (K8s) cluster integration can connect with your Native K8s service using your provided kubeconfig file.

Prerequisites before you Configure Mend.io’s Kubernetes Integration for Native K8s

  • Your Mend user must be an organization administrator

  • Your provided kubeconfig file is in JSON or YAML file format and contains the following scopes:

    • apiVersion

    • kind

    • clusters

    • users

    • contexts

Set up the Mend Kubernetes Integration for Native K8s in the Mend Platform UI

Step 1 - General Details
image-20250709-081335.png
  1. Fill in the desired Display Name (mandatory).

  2. Add a Description (optional).

  3. Select the Environment (Production/Dev/QA/Staging). (Mandatory; multi-selection is supported).

    image-20240320-073237.png
Step 2 - Authentication

Drag and drop your Kubeconfig file into the designated box or click the + button to browse for it in your file system.

image-20250709-081219.png

Once uploaded, use the Test Connection button to verify connectivity. Once verified, you can proceed to the next step.

Step 3 - Clusters

The summary of detected clusters will be displayed. Click Next to proceed to the next step.

image-20250714-160644.png
Step 4 - Configuration

Fill in the Configuration information to define your scan schedule:

image-20250714-134217.png
  • Enable Schedule - Toggle off to disable scheduling.

  • Scan Time

  • Frequency

  • Scan on Connect - While toggled on, it means a scan will be triggered automatically once the integration setup is completed.

Scheduling image registry scans is crucial for maintaining the security and integrity of your container images. By default, a scan interval of 7 days will be applied. You can change the scan interval in 1-day increments or select specific days of the week when you wish for scans to be executed.

Note: After the first scan (in which the latest 10 tags are scanned), in every scheduled scan only newly pushed images from the registry or changed images will be scanned. This is because vulnerability and package updates occur automatically in an asynchronous manner, keeping the security information up-to-date without requiring new scans.

Click the Next (image-20240727-113029.png) button at the bottom right to move on to the next step.

Step 5 - Summary

In this step, the summary of your input from the previous steps will be displayed. You can go back to the previous screens of the wizard to make changes, by clicking the ‘Back’ button at the bottom right corner of the screen. If you wish to confirm your configuration and add your registry, click the ‘Done’ button:

image-20240727-114442.png

A Registry Added Successfully message will pop-up at the bottom-left corner of the user interface once the integration credentials and configuration have been verified:

image-20240328-191507.png

Reference

Mend Kubernetes Integration - Native K8s Parameters

Parameter

Description

Display Name

The name of your K8s integration. This will be displayed in the Integrations dashboard → Kubernetes tab.

Description

Optional. Provide any text. We recommend providing information that will help you remember the integration.

Environment

Select the type of environment of your K8s native service (multiple options can be selected). The environment options are:

  • Production

  • Dev

  • QA

  • Staging

Kubeconfig

Drag & drop or click on Select File to provide your kubeconfig file for the integration.


JavaScript errors detected

Please note, these errors can depend on your browser setup.

If this problem persists, please contact our support.