Overview
The Mend container image registry scanning solution can integrate with your private Google Artifact Registry (GAR).
Getting it done
Prerequisites before you scan GAR with Mend Container
-
Your Mend.io user must be an organization administrator.
-
As part of the setup, you will be required to authorize Mend Container to access your registry using a service account JSON key file. A typical JSON token blob should look like this:
{
  "type": "service_account",
  "project_id": "my_project_id",
  "private_key_id": "XXXXXXXXXXXXXXXXXXXXXXXXXXXXXXXXXXXX",
  "private_key": "-----BEGIN PRIVATE KEY-----\nXXXXXXXXXXXXXXXXXXXXXXXXXXXXXXXXXXXXXXXXXXXXXXXXXXXXXXXXXXXXXXXXXXXXXXXXXXXXXXXXXXXXXXXXXXXXXXXXXXXXXXXXXXXXXXXXXXXXXXXXXXXXXXXXXXXXXXXXXXXXXXXXXXXXXXXXXXXXXXXXXXXXXXXXXXXXXXXXXXXXXXXXXXXXXXXXXXXXXXXXXXXXXXXXXXXXXXXXXXXXXXXXXXXXXXXXXXXXXXXXXXXXXXXXXXXXXXXXXXXXXXXXXXXXXXXXXXXXXXXXXXXXXXXXXXXXXXXXXXXXXXXXXXXXXXXXXXXXXXXXXXXXXXXXXXXXXXXXXXXXXXXXXXXXXXXXXXXXXXXXXXXXXXXXXXXXXXXXXXXXXXXXXXXXXXXXXXXXXXXXXXXXXXXXXXXXXXXXXXXXXXXXXXXXXXXXXXXXXXXXXXXXXXXXXXXXXXXXXXXXXXXXXXXXXXXXXXXXXXXXXXXXXXXXXXXXXXXXXXXXXXXXXXXXXXXXXXXXXXXXXXXXXXXXXXXXXXXXXXXXXXXXXXXXXXXXXXXXXXXXXXXXXXXXXXXXXXXXXXXXXXXXXXXXXXXXXXXXXXXXXXXXXXXXXXXXXXXXXXXXXXXXXXXXXXXXXXXXXXXXXXXXXXXXXXXXXXXXXXXXXXXXXXXXXXXXXXXXXXXXXXXXXXXXXXXXXXXXXXXXXXXXXXXXXXXXXXXXXXXXXXXXXXXXXXXXXXXXXXXXXXXXXXXXXXXXXXXXXXXXXXXXXXXXXXXXXXXXXXXXXXXXXXXXXXXXXXXXXXXXXXXXXXXXXXXXXXXXXXXXXXXXXXXXXXXXXXXXXXXXXXXXXXXXXXXXXXXXXXXXXXXXXXXXXXXXXXXXXXXXXXXXXXXXXXXXXXXXXXXXXXXXXXXXXXXXXXXXXXXXXXXXXXXXXXXXXXXXXXXXXXXXXXXXXXXXXXXXXXXXXXXXXXXXXXXXXXXXXXXXXXXXXXXXXXXXXXXXXXXXXXXXXXXXXXXXXXXXXXXXXXXXXXXXXXXXXXXXXXXXXXXXXXXXXXXXXXXXXXXXXXXXXXXXXXXXXXXXXXXXXXXXXXXXXXXXXXXXXXXXXXXXXXXXXXXXXXXXXXXXXXXXXXXXXXXXXXXXXXXXXXXXXXXXXXXXXXXXXXXXXXXXXXXXXXXXXXXXXXXXXXXXXXXXXXXXXXXXXXXXXXXXXXXXXXXXXXXXXXXXXXXXXXXXXXXXXXXXXXXXXXXXXXXXXXXXXXXXXXXXXXXXXXXXXXXXXXXXXXXXXXXXXXXXXXXXXXXXXXXXXXXXXXXXXXXXXXXXXXXXXXXXXXXXXXXXXXXXXXXXXXXXXXXXXXXXXXXXXXXXXXXXXXXXXXXXXXXXXXXXXXXXXXXXXXXXXXXXXXXXXXXXXXXXXXXXXXXXXXXXXXXXXXXXXXXXXXXXXXXXXXXXXXXXXXXXXXXXXXXXXXXXXXXXXXXXXXXXXXXXXXXXXXXXXXXXXXXXXXXXXXXXXXXXXXXXXXXXXXXXXXXXXXXXXXXXXXXXXXXXXXXXXXXXXXXXXXXXXXXXXXXXXXXXXXXXXXXXXXXXXXXXXXXXXXXXXXXXXXXXXX==\n-----END PRIVATE KEY-----\n",
  "client_email": "XXXXXXXXXXXXXXX@XXXXXXXXXXXXXX.iam.gserviceaccount.com",
  "client_id": "XXXXXXXXXXXXXXXXXXXXXXXXX",
  "auth_uri": "https://accounts.google.com/o/oauth2/auth",
  "token_uri": "https://oauth2.googleapis.com/token",
  "auth_provider_x509_cert_url": "https://www.googleapis.com/oauth2/v1/certs",
  "client_x509_cert_url": "https://www.googleapis.com/robot/v1/metadata/x509/XXXXXXXXXXXXXXXXXXXXXXXXXXXXXXX.iam.gserviceaccount.com"
}
Set up your private GAR configuration via the Mend Platform UI
-
In the platform UI, navigate to
-
Scroll down to the Registries section and click Google Artifact Registry.

The Setup Wizard
Step 1 - General Details
Fill in the General Details fields:

a. Display Name
b. Description (optional)
c. Address - The registry endpoint, e.g., gcr.io, us-central1-docker.pkg.dev, etc.
d. Environment (multi-selection is supported)
Click the ![]()
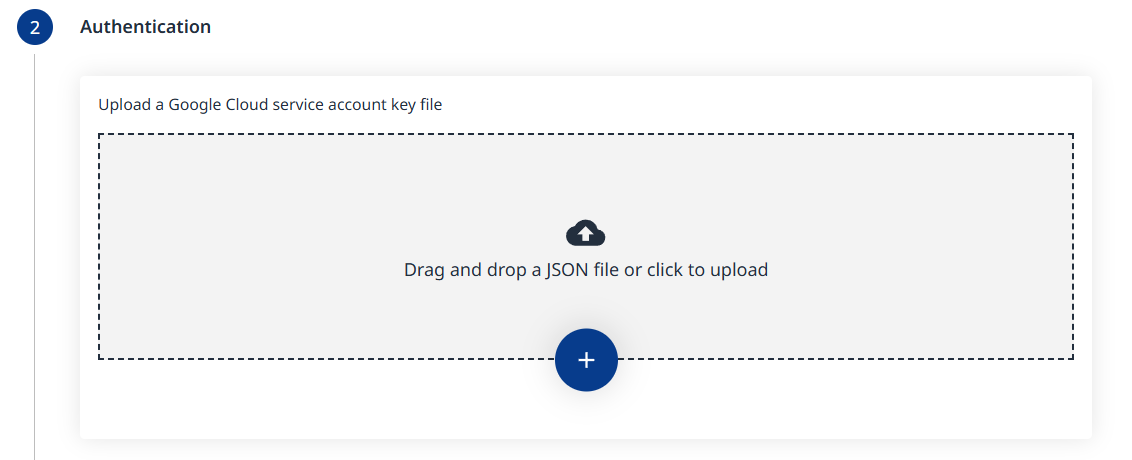
Step 2 - Authentication
Upload a Google Cloud service account key file in JSON format.
Click the ![]()
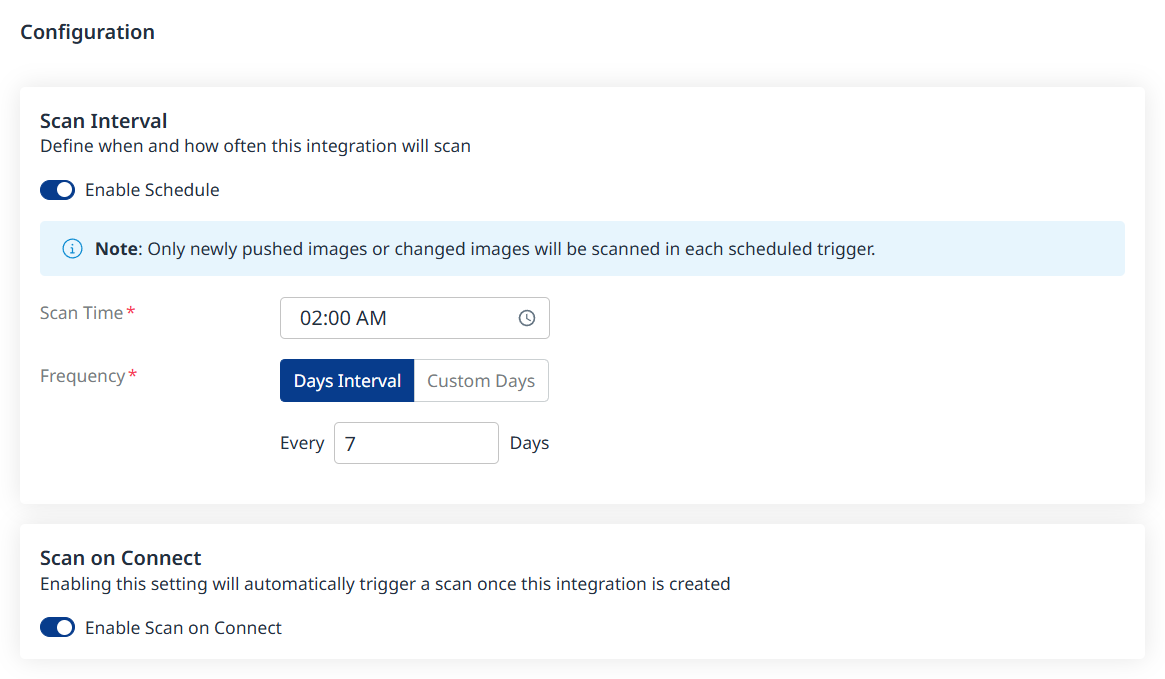
Step 3 - Configuration
Fill in the Configuration information to define your scan schedule:
-
Enable Schedule - Toggle off to disable scheduling.
-
Scan Time
-
Frequency
-
Scan on Connect - While toggled on, it means a scan will be triggered automatically once the integration setup is completed.
Scheduling image registry scans is crucial for maintaining the security and integrity of your container images. By default, a scan interval of 7 days will be applied. You can change the scan interval in 1-day increments or select specific days of the week when you wish for scans to be executed.
Note: After the first scan (in which the latest 10 tags are scanned), in every scheduled scan only newly pushed images from the registry or changed images will be scanned. This is because vulnerability and package updates occur automatically in an asynchronous manner, keeping the security information up-to-date without requiring new scans.
Click the ![]()
Step 4 - Pull and Scan Inventory
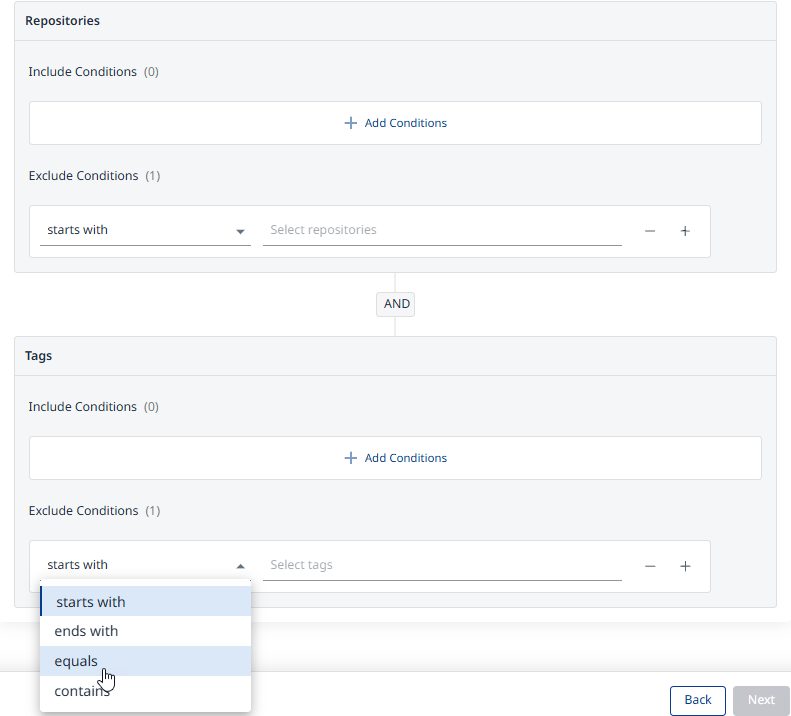
Define which repositories and tags should be pulled and scanned using include/exclude filters:
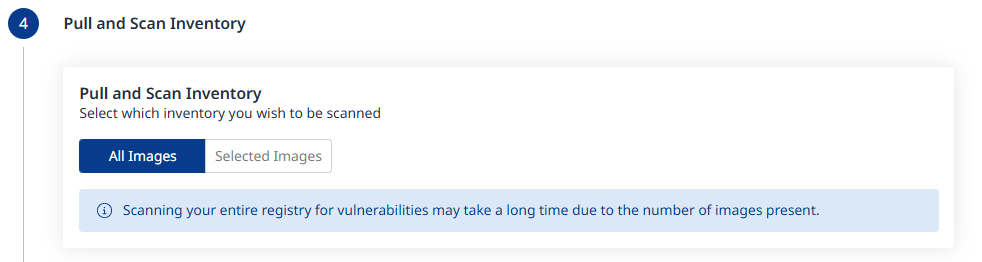
All Images will be the default. When changing this to Selected Images as shown below, click Add Conditions to add Include and/or Exclude conditions, for both Repositories and Tags.
Step 5 - Summary
In this step, the summary of your input from steps 1-3 will be displayed. You can go back to the previous screens of the wizard to make changes, by clicking the ‘Back’ button at the bottom right corner of the screen. If you wish to confirm your configuration and add your registry, click the ‘Done’ button:
A Registry Added Successfully message will pop-up at the bottom-left corner of the user interface once the integration credentials and configuration have been verified:

Note: Before adding your registry, a connectivity check will be performed automatically, to ensure the credentials are valid and the registry is accessible for the integration.