Understanding the Project Dashboard
Overview
IMPORTANT
For customers with Vulnerability-based Alerting enabled, note the following changes:
Clicking on the Per-Library Alerts panel launches Manage Library Security Alerts
Clicking on Per-Vulnerability Alerts panel launches Manage Security Alerts
The pie chart is now Vulnerability Analysis, plus:
Adjustments to text
The count is now per CVE (not library)
If Effective Usage Analysis is enabled, there are no more gray shields
The Project dashboard displays detailed information about a specific project. It can be accessed from the Projects menu item in the main menu.
This topic explains the main usages of Mend's Project dashboard.
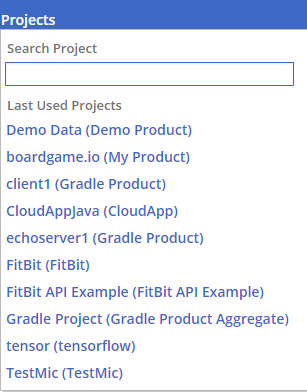
The main goal of the Project page's dashboard is to provide the user with a view of the Projects' open-source status. Clicking the Projects menu item displays a sub-menu that includes a search mechanism for finding Projects and the last ten Projects that were viewed.

Project Actions Menu
The buttons above the dashboard enable you to perform the following actions on a specific project:
Policies: Create relevant policies for a specific project.
Compare to other projects: Compare the project information to other projects in the organization. For details, see the Project Comparison Report.
Request History: Opens the Requests History report displaying requests for the whole project. For details, see The Request History Report .
Settings icon (cogwheel): Navigate to the Project Administration settings page, where you can:
Modify the project name
Copy the project token
Add tags to the project
Delete the project
Project Alerts
The Project Alerts pane shows valuable information about actual library (component) alerts generated for a project.

Note:
In the Security Per-Library Alerts section, each severity level shows the number of libraries where that severity is the highest (Critical, High, Medium, or Low).
Clicking on any of the values in the Security Per-Library Alerts you will see the Security Alerts: View by Library page
See here for a detailed description of the alert type categories shown above.
New Version Alerts
The New Versions category shows the number of alerts triggered for scanned libraries found to be out-of-date (i.e., not having the latest version).
Whenever an out-of-date library is located in the inventory, a new alert is generated and displayed in the Alerts report. To access this report, from the project page, click the number in the New Versions panel in the dashboard.
The Alert shows the out-of-date library and indicates the new version.
NOTE: New version alert(s) apply only to direct dependencies and not transitive dependencies. To check if a library is a direct or transitive dependency, refer to:
https://docs.mend.io/legacy-sca/latest/understanding-the-library-details-page#UnderstandingtheLibraryDetailsPage-ImpactAnalysis.
Vulnerability Analysis
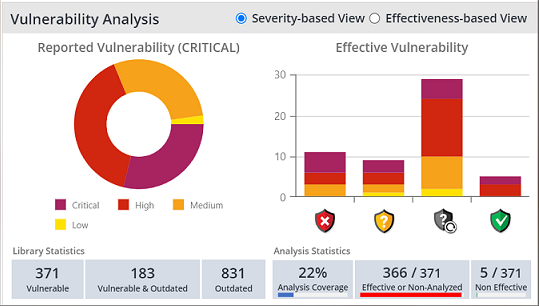
The Vulnerability Analysis pane provides an analysis of your organization’s vulnerabilities.

Reported Vulnerability: Shows the library distribution based on the highest vulnerability severity – Critical, High, Medium, or Low.
Clicking on the pie chart launches the Security Alerts: View by Library screen, where you can review vulnerability statistics, such as the number of reported vulnerabilities and ignored alerts for a selected library, and ignore and activate (restore) a selection of vulnerability alerts associated with a library.Effective Vulnerability: Shows the vulnerability severity distribution based on an effectiveness indicator (i.e., shield).
You can select to view the effective vulnerability in two modes: Severity-based view (includes severity) or Effectiveness-based view.
Clicking on the Effective Vulnerability graph launches the Security Alerts: View by Vulnerability screen, where you can manage the alerts per vulnerability according to specific products/projects. For example, use this screen to ignore alerts of a specific vulnerability across all libraries in the selected scope.Library Statistics:
o Vulnerable: The total count of vulnerable libraries.
o Vulnerable & Outdated: The total count of outdated and vulnerable libraries (counts the libraries that have newer versions and include vulnerabilities).
o Outdated: The total count of outdated libraries (counts the libraries that have newer versions).
Analysis Statistics:
o Analysis Coverage: The percentage of analyzed libraries (excluding libraries marked with a gray shield) from the total count of libraries that can be analyzed.
o Effective or Non-Analyzed: Overall Effective Vulnerability Index which reflects the relative portion of security alerts that are not marked with a green shield.
o Non-Effective: Non-Effective Vulnerability Index which reflects the relative portion of security alerts that are marked with a green shield.
Project Vitals

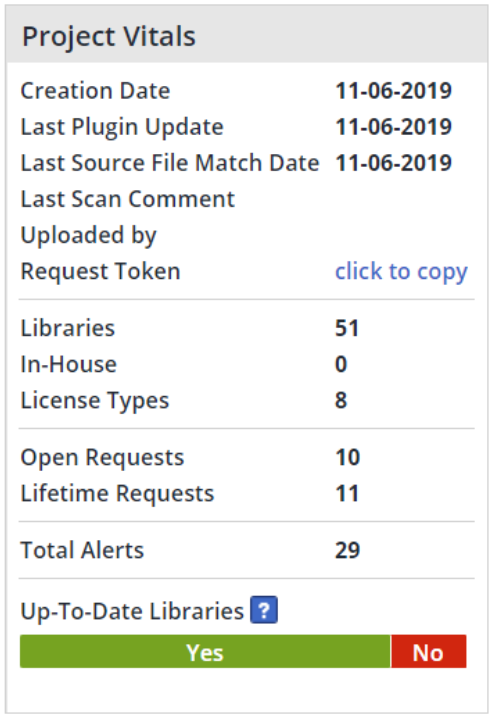
The Project Vitals pane displays basic information about a project:
Creation Date: When the Project was created.
Last Plugin Update: The last time a plugin successfully executed and updated the inventory.
Last Source File Match Date: The latest date of the Gitta cached results (if no cached results exist for this project, the label is not displayed).
Last Scan Comment: The last manually added a comment to the scan. Comments can be added to a scan via the configuration file or the CLI.
Uploaded by: User name of who initiated the last scan.
Request Token: Click the click to copy link to copy the request token of the project.
NOTE: The request token is only available for projects that were scanned at least once in the last month.
Libraries: The total number of libraries in the Project's inventory.
In-House: The total number of in-house libraries in the Project's inventory.
License Types: The number of unique license types.
Open Requests: The number of requests pending approval.
Lifetime Requests: The number of requests created since the creation of the Project.
Total Alerts: The number of open alerts.
Up-To-Date Libraries: Displays the percentage of updated libraries and libraries with a newer version available, hover each section for more details.
Libraries
The Libraries section shows detailed information about the Project libraries (components).
NOTE: If required, you can toggle the Show as Hierarchy button to display the project libraries as a Flat List.
Displays the library inventory (BOM) of your Project with the following fields:
Library Name: Clicking the library name redirects you to the specific library details page.
The letters to the left of the library name indicate the following:
E - exists in the project
S - source code library
P - pending
R - rejectedDescription: Description of the library.
Licenses: Licenses associated with the library.
From the Actions dropdown menu, you can perform the following actions on a selected library or multiple selected libraries:
Remove Libraries: This enables you to delete selected libraries from the inventory.
Set Attribute Value: Select an attribute and assign it a value that will be applied to all the selected libraries in the project.
Mark as In-House: Mark the selected libraries as In-House libraries. You also have the option to mark all instances of the selected libraries as In-House libraries.
Add to Whitelist: Add the selected libraries to the Whitelist libraries approved for usage by your company.
Assign License: Assign a license to the selected libraries from the License dropdown list. Enter a Liability Reference to explain why you chose this license and optionally, enter any additional comments. In License Text (Optional), you can manually override the text to your library's specific license text.
Request Resolution: Make a resolution request for the selected libraries according to License (default) and/or Copyright. Note that a resolution request only affects libraries that do not have assigned licenses or copyrights.
From the Export dropdown menu in this section, you can export the information to Excel/XML so it may be shared with others.
Deleting a Library
This procedure describes how to delete a library from your inventory.
NOTE: A library that has a pending request cannot be deleted.
In the Libraries section of the Project dashboard, select the library/libraries that you want to delete, and from the Actions menu, select Remove Libraries.
A dialog box opens asking you to confirm the libraries for removal and displaying any impacted libraries that will also be removed.If required, you can add comments about why you are removing the libraries.
Click I’m Sure to delete the libraries.
License Analysis
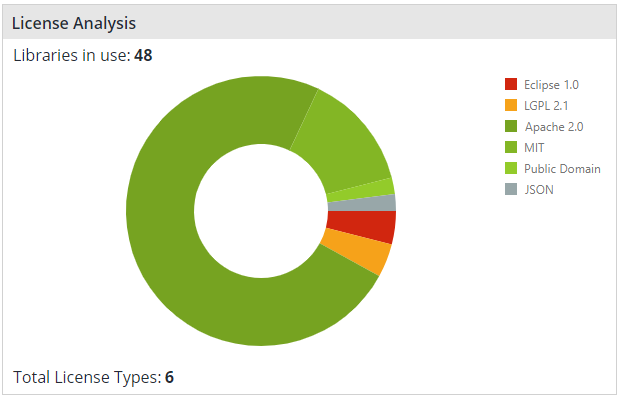
The project dashboard also provides license distribution data in which you can see the license resolution in your organization.
The number of libraries in use and the number of different license types are also displayed.
Pointing to any part of the chart will show the relevant license.
License Analysis
The License Analysis pie chart shows the license distribution data in which you can see the license resolution in the Project.
The total number of libraries currently in use and the number of different license types are also displayed.

Pointing to any part of the chart will show the relevant license.
Pending Tasks
Pending Tasks are a way to automatically create tasks for any new libraries added to your inventory. You can find them on the home screen or on the Product and Project dashboards. When enabled, any plugin request with a new library will create a task that will be assigned to the Default Approver (Admin > Assignments). Tasks are only created when the inventory is updated.

Clicking More… will redirect you to the Organizational Pending Tasks page, where you can view the pending tasks in greater detail.
In the Organizational Pending Tasks page, you can select one or multiple pending tasks, and then click More Information (relevant only in Vulnerability-based Alerts organizations). The Library Vulnerabilities and Licenses pop-up screen is displayed, enabling you to view the number of vulnerable libraries plus license information for the selected components.
Requested by Me
Requested By Me displays the user the update requests sent by the user from the plugins regarding new libraries. Clicking More.. will redirect you to the Organizational Tasks page.

