NOTE: For customers who have enabled Vulnerability-based Alerting (see Security Alerts: View By Vulnerability), this report is no longer available.
Overview
The Ignored Alerts Report provides information about alerts that were defined as 'ignored' in the The Alerts Report .
Alerts that are marked as ignored will not appear in dashboards and reports. You can reactivate ignored alerts, whereby they will revert to active state and be restored in the application and re-appear in dashboards and reports.
Accessing the Ignored Alerts Report
-
From the main menu, select Reports > Ignored Alerts. The Ignored Alerts Report page is displayed.
-
From the All Time dropdown menu, select the required time range for the report. Options are: All Time (default), Last Month, Last 3 Months, Last 6 Months, Last 12 Months.
-
Select the scope for which the report should be created. The default scope is Organizational; however you can select any individual product and/or project for your data scope from the dropdown menus next to the report name. Do as follows:
-
Open the All Products dropdown menu and select the product on which you want to base the report.
-
If you want to base the report on specific projects within the product, open the All Projects dropdown menu and select the projects.
-
Click Apply and wait for the data to load into the report table.
-
-
To further filter the report, do as follows:
-
Expand the Filter area, select a property, and enter the value by which to filter.
The property options are: Library (default), Type, Library Type, Creation Date, Modified Date, and Comments. -
Click Filter.
-
-
You can also filter the report by alert types. To do this:
-
Select or clear the All or Security radio buttons to display all alert types or just security alerts. By default, All is selected.
You can deselect any of the selected alert types by clearing the check boxes in the Filter area.
NOTE: You can quickly select all the alert types by clicking the select all alert types link or clear all the check boxes by clicking the deselect all alert types link.
-
After defining all the relevant filters, the Ignored Alerts Report is generated displaying all the relevant alerts.
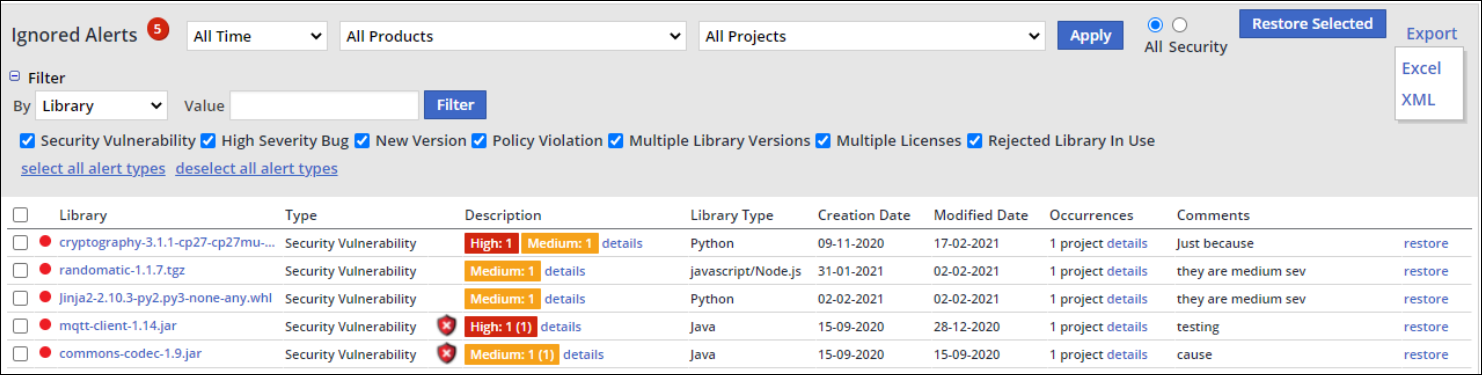
Understanding the Report Data
The Ignored Alerts Report displays the following attributes per ignored alert:
-
Library: Name of the open source library. Click the library name to be forwarded to its Library Details page.
-
Type: Alert type. Can be one of the following:
-
Security Vulnerability
-
High Severity Bug
-
New Version
-
Policy Violation
-
Multiple Library Versions
-
Multiple Licenses
-
Rejected Library In Use
-
-
Description: Overall bug rating of the library that is determined by the severity of the bug(s) and the number of bugs that were found. The following ratings are provided:
-
High: Assigned to libraries with at least 1 blocker, 1 critical or 10 major bugs.
-
Medium: Assigned to libraries with 1-9 major bugs.
-
Low: Assigned to all other libraries that are not High or Medium.
-
You can click on the details link for more information on the library and its vulnerabilities.
-
Library Type: Java, source library, etc.
-
Creation Date: Date the alert was created.
-
Modified Date: Date when the alert status was changed from active to ignored.
-
Occurrences: Number of instances in which the alert was generated in any project in the organization. You can click the details link to see where the alerts occurred according to product and project.
-
Comments: Text that describes the reason the alert was ignored.
-
restore: Click restore to return a selected ignored alert to the Alerts Report as an active alert. For details, see the next section Restoring Alerts.
Restoring Alerts
In the Ignored Alerts Report, you can reactivate ignored alerts, whereby they will revert to active state and be restored in the application and re-appear in dashboards and reports.
-
To reactivate a single alert, select its checkbox and click the restore link at the right of the row.
-
To reactivate multiple alerts, select their checkboxes and click the Restore Selected button.
-
To reactivate All alerts in the report table simultaneously, select the checkbox above the table in the column titles row, and click the Restore Selected button.
Exporting the Report
To export the report, click the Export dropdown menu at the top right corner of the report, and select the required export format:
-
Excel
-
XML
The exported report will reflect the selected scope (organization, product, or project) and filters.
For examples of exported report types, see https://docs.mend.io/legacy-sca/latest/the-reports-menu#TheReportsMenu-ExportingReports .