Configuring Notification Settings
Overview
IMPORTANT
For users who have Security Alerts: View By Vulnerability enabled, note the following changes for status updates containing new alerts emails:
The section titles in email notifications have been changed from Security Library to Library Security Vulnerabilities.
In each Library Security Vulnerabilities section, next to the library name, the total count of security vulnerabilities for the library is displayed.
In each Library Security Vulnerabilities section, each vulnerability is displayed in a separate row along with its reported severity
Organization administrators can receive email notifications regarding the following project information:
Changes to your inventory
New alerts and alerts in general
New and pending requests
You can define the frequency of the notifications (every week/month or not at all) and the type of notifications that will be sent.
Accessing the Notifications Settings
To configure notifications settings, do as follows:
In the Mend Web Application Home page, click Admin. The Organization Administration page is displayed.
In the Settings area, click Notifications. The Notifications Settings page is displayed.

Click Edit. The Edit Notification Rule dialog box is displayed.
The settings are as follows:
New Tasks: Enable\Disable sending this type of email notification.
Requests Closed by Policy: Enable\Disable sending this type of email notification.
Project Setup Completion: Enable\Disable sending this type of email notification. You also have the option to customize this action via patterns that are defined in project tags.
Audit Log Events: Enable\Disable receiving email notifications upon specifically designed audit log events.
To enable a setting, in Notification Type, access the setting, and in Action, click Enabled.
If you select the Notify On Project Setup Completion notification type then you can also define tag key and tag value patterns as the notification rule. See Creating Project Tag Keys and Values.
Click OK.
Repeat for each notification setting that you need.
In Status Updates on top, define the frequency of the status updates. Options are every week, every month, or no status updates at all.
Another way to enable or disable notifications on a user level is to access the System Notifications settings:
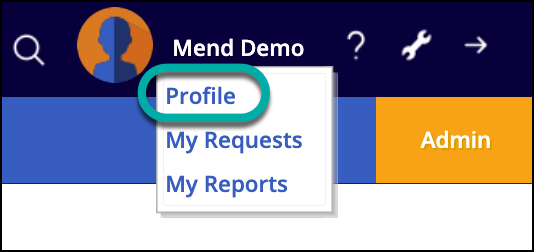
In the Mend Web Application Home page, hover your User Name and click Profile:

Select the Organization for which you would like to enable/disable notifications.

Editing Notification Rules
To edit any of the notification types rules, simply click Edit again and modify any of the settings as needed.
Disabling Notification Emails
To disable all notification administrator emails, do as follows:
In Status Updates on top, select Disable All Email Notifications. All email notifications are immediately disabled.
Re-enabling Notification Emails
To enable all disabled notification administrator emails, do as follows:
In Status Updates on top, select Disable All Email Notifications. All email notifications are immediately re-enabled.
Creating Project Tag Keys and Values
Project tag keys and values can be used to easily filter projects. For example, you can add the key Production for all projects that are used for that purpose, To define key tags and values, do the following:
Go to a specific project page and click the Manage this project cogwheel icon.

In the Project Tags table, click the Add Tag button. The Add Tag dialog box is displayed.
In Key, enter a key, and (optional) in Value, enter a value for the tag key.
Click OK. The newly defined key is displayed in the Project Tags table.
Repeat this procedure to add additional project tag keys.
