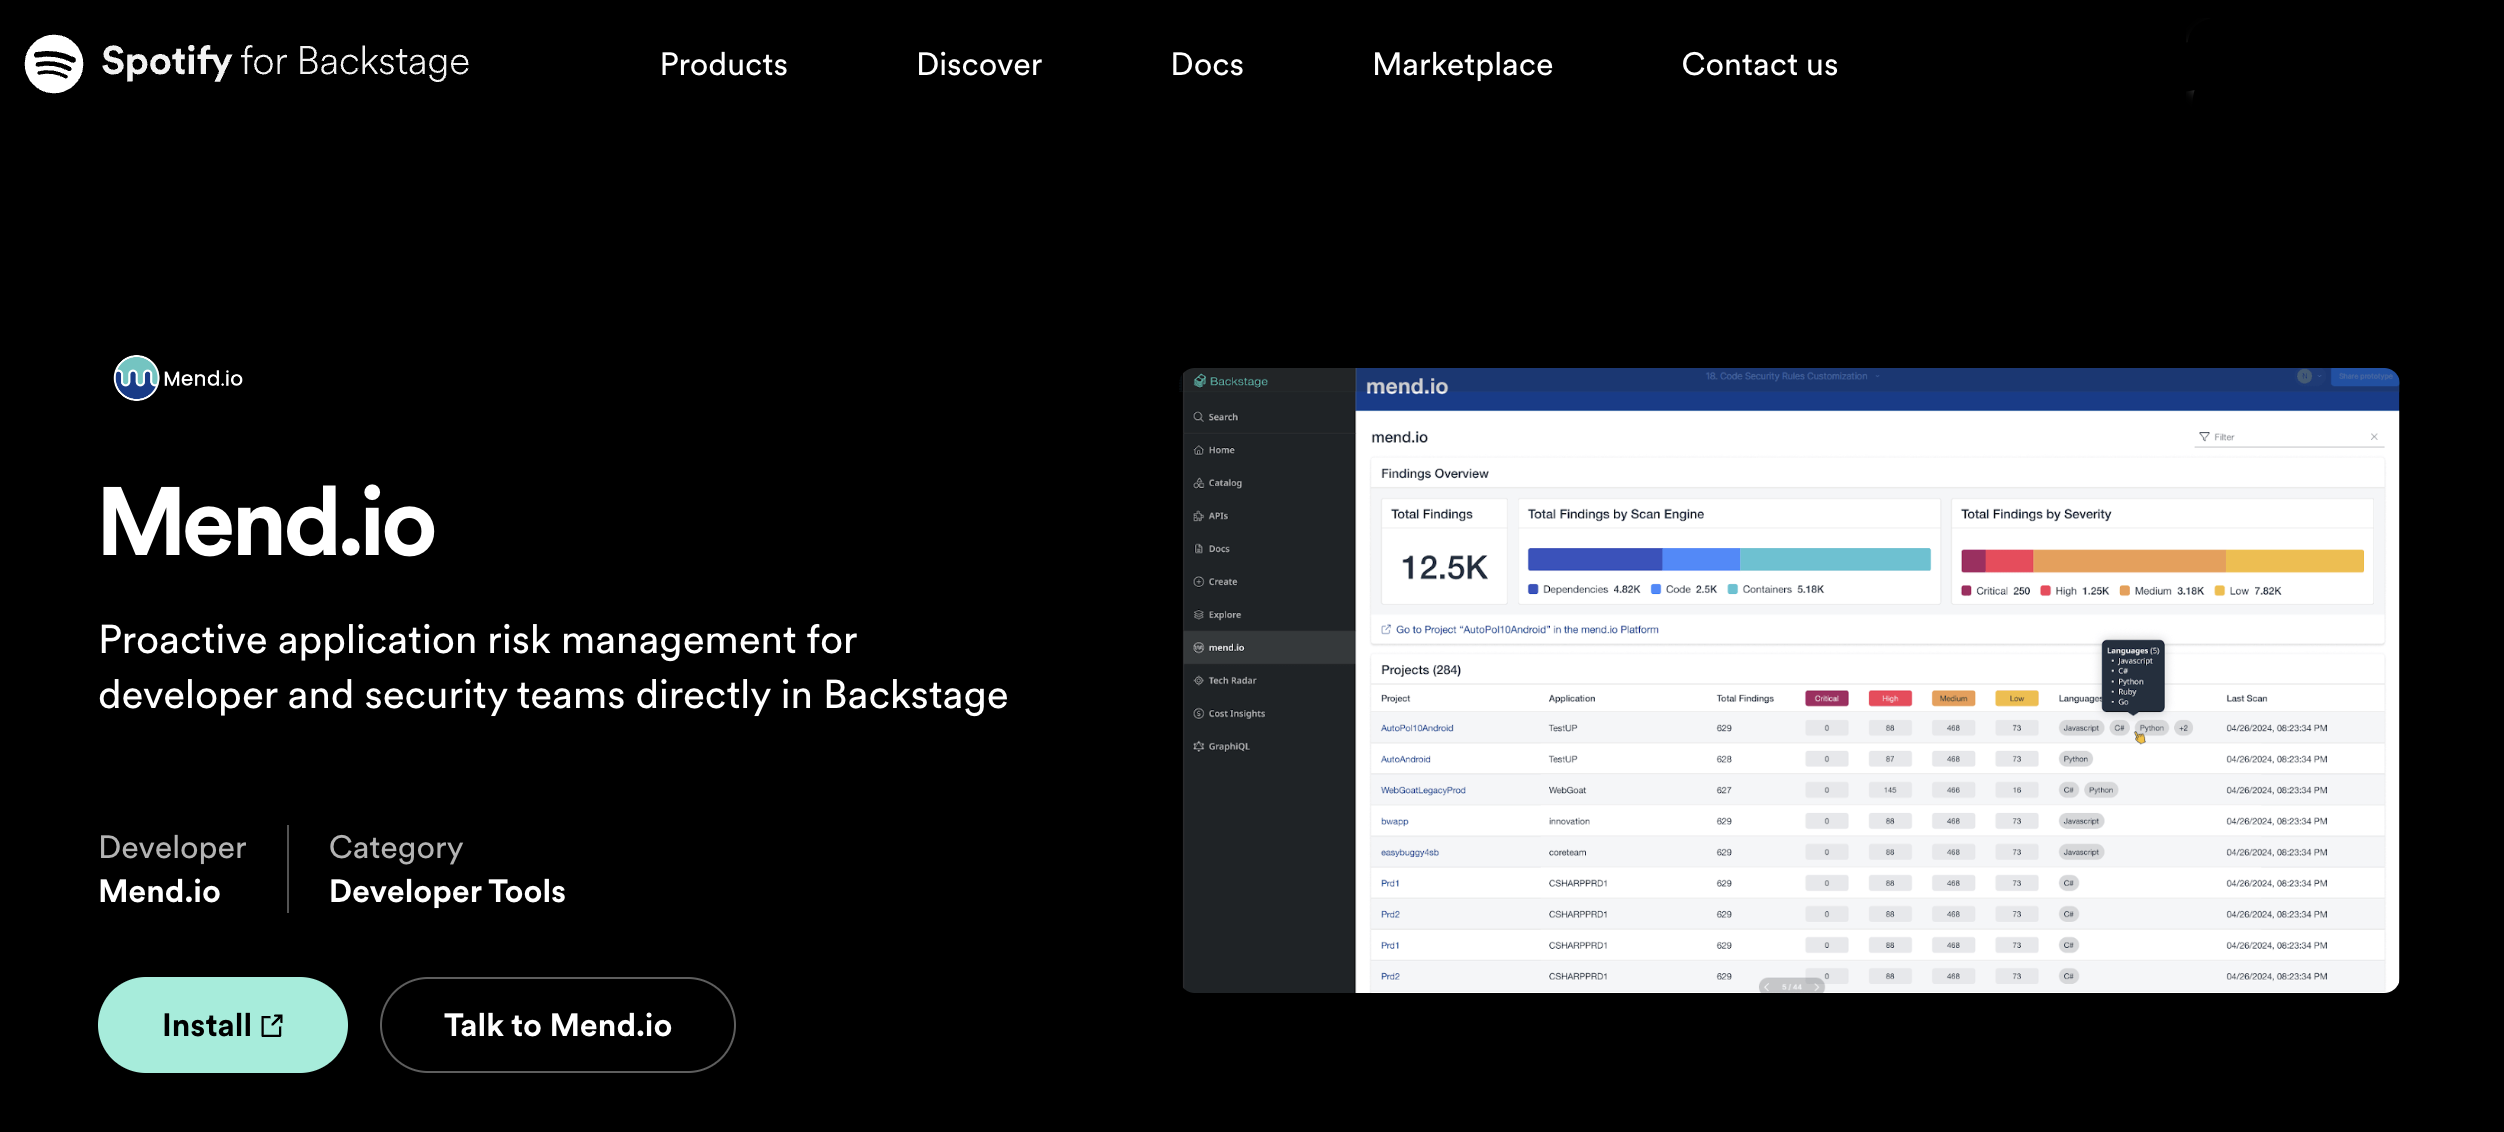
Overview
Mend.io is integrated with Backstage, the open-source framework for building developer portals. This integration enables proactive application risk management for developers and security teams directly in Backstage.
The plugin empowers developers to code securely by automatically checking for security vulnerabilities with every code commit. Developers can review and address newly introduced vulnerabilities by Mend.io directly in Backstage, reducing the overall application security risk and delivering more secure applications.
Getting it done
Prerequisites
-
Plugin Compatibility: The plugin has been successfully tested with Backstage v1.46.1. If you are using a newer version of Backstage, please file an issue through the GitHub repository, and Backstage will provide guidance on the best integration practices for your specific version.
-
This plugin works with SCM like Github, Bitbucket Cloud, Azure Repo and Gitlab.
-
The entity for a repository must be present within Backstage to see the Mend results. Use the Backstage Integrations guide to register your repositories on your Backstage instance; Integration will only register the repository if it contains a
catalog-info.yamlfile. -
You need appropriate access permissions to an entity in Backstage to view its Mend results within Backstage.
-
Note: The Backstage frontend plugin will not function without the backend plugin.
Install the Mend Frontend plugin for Backstage
Note: The frontend plugin will not function without the backend plugin.
Download the Plugin
You can download the frontend plugin from the Backstage Marketplace:
From your Backstage root directory, run the following commands:
yarn --cwd packages/app add @backstage-community/plugin-mend
The Mend Plugin also supports the Spotify Portal. Please use the same npm packages to install the plugin into the portal. Further details about how to install a plugin can be found in the Portal documentation.
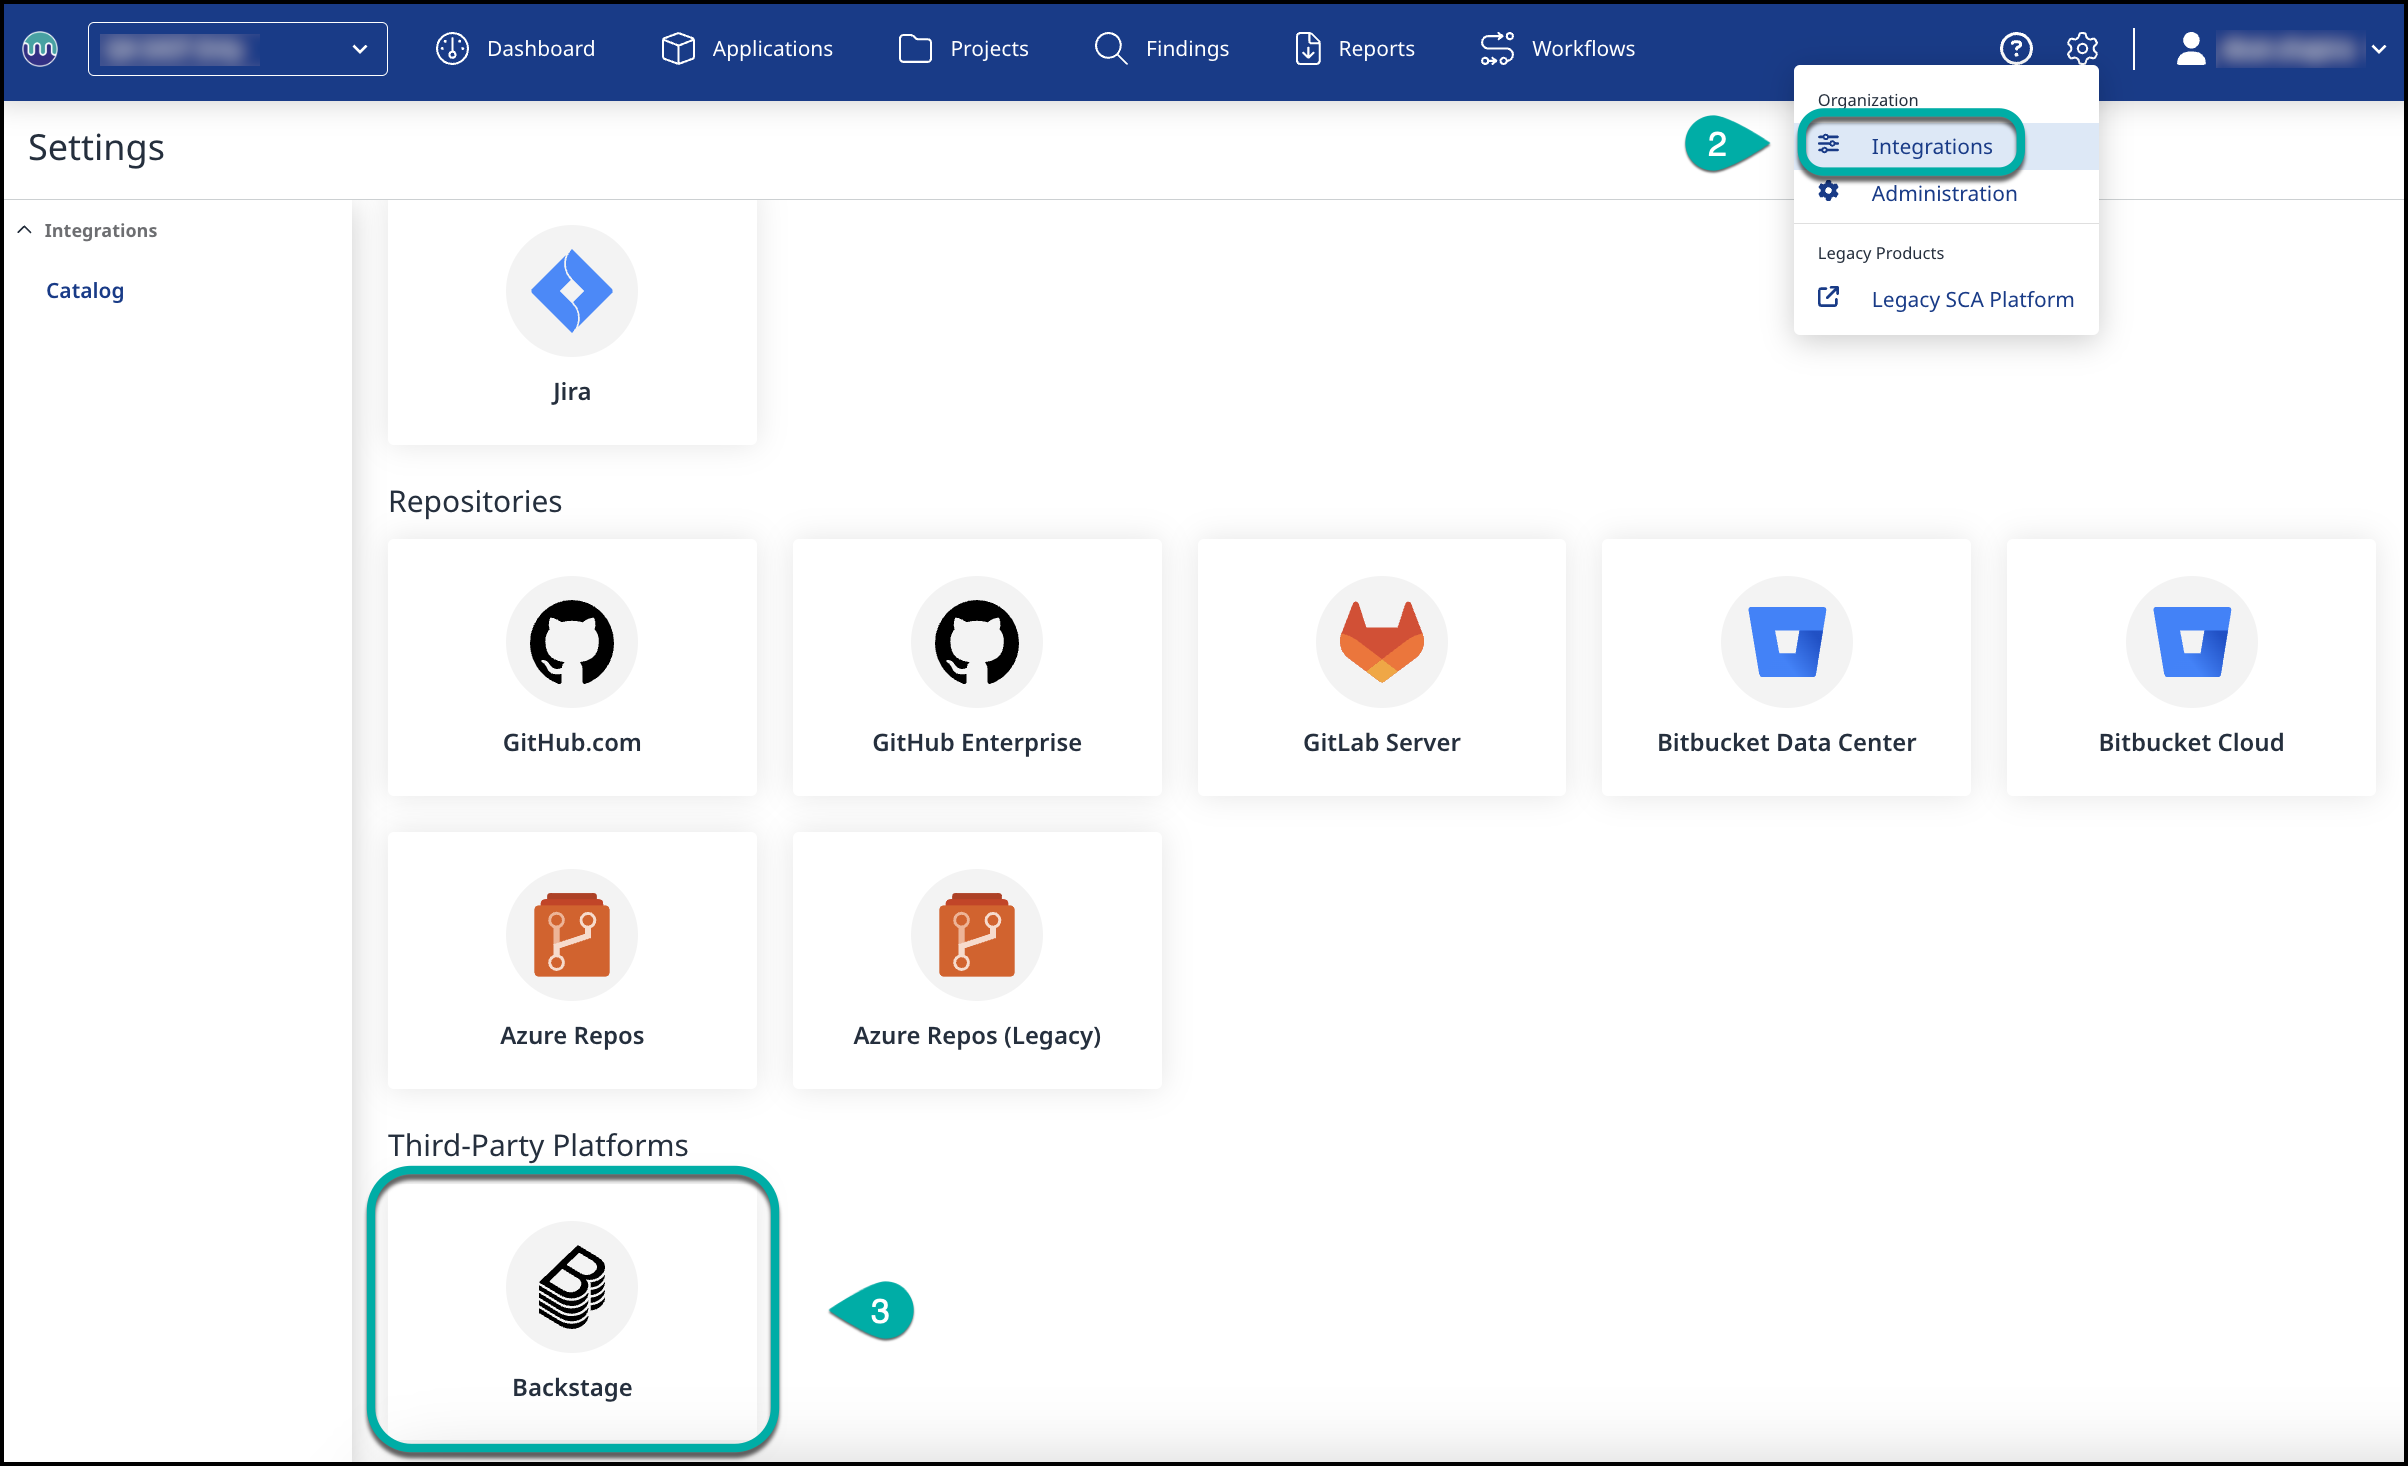
Retrieve your Activation Key from the Mend Platform
-
Log into your organization via the Mend Platform.
Note: Make sure you are an organization administrator. -
Navigate to the settings “cog” icon → Integrations:
-
Click on the Backstage card. Then, click on the Generate Activation Key button that appears to get your activation key for the Backstage Integration:

-
Copy and save this value for the next step.
Configure your Mend Activation Key
In the Backstage application, configure your Mend Activation Key in your app-config.yaml or production app-config.production.yaml file:
mend:
  activationKey: ${YOUR_ACTIVATION_KEY_HERE}
Configure Mend Plugin for Backstage
The following annotation used by the plugin fetches the corresponding project for the entity.
mend.io/project-ids: <project-ids>
Let's break this down:
-
mend.io/project-ids: Annotation key for the Mend plugin -
<project-ids>: list of Mend Project Ids that linked to particular entity
Here's what that will look like in action:
# Example catalog-info.yaml for Component entity
apiVersion: backstage.io/v1alpha1
kind: Component
metadata:
  name: my-component
  annotations:
    mend.io/project-ids: <project-ids>
---
The @backstage-community/plugin-catalog-backend-module-mend-entity-processor package will add this annotation automatically. Please find steps here to install this.
Add the Mend tab to your entity page:
In your packages/app/src/components/Catalog/EntityPage.tsx file:
// ... other imports here
import {
  MendTab,
  isMendProjectAvailable,
} from '@backstage-community/plugin-mend';
// ... other components
const serviceEntityPage = (
  <EntityLayout>
    <EntityLayout.Route path="/" title="Overview">
      // ... other elements
      <EntityLayout.Route
        if={isMendProjectAvailable} // Remove this if condition to always display the MendTab
        path="/mend"
        title="Mend.io"
      >
        <MendTab />
      </EntityLayout.Route>
      // ... other elements
    </EntityLayout.Route>
  </EntityLayout>
  // ...
);
// ...
isMendProjectAvailable : Use this to display the Mend tab based on presence of the mend.io annotation
Add the Mend page to your routes:
In your packages/app/src/App.tsx file:
// ... other imports here
import { MendPage } from '@backstage-community/plugin-mend';
// ... other components
const routes = (
  <FlatRoutes>
    <Route path="/" element={<Navigate to="catalog" />} />
    <Route path="/catalog" element={<CatalogIndexPage />} />
    // ... other elements
    <Route path="/mend" element={<MendPage />} />
    // ... other elements
  </FlatRoutes>
  // ...
);
// ...
Add the Mend sidebar button:
In your packages/app/src/components/Root/Root.tsx file:
// ... other imports here
import { MendSidebar } from '@backstage-community/plugin-mend';
// ... other components
export const Root = ({ children }: PropsWithChildren<{}>) => (
  <SidebarPage>
    <Sidebar>
      // ... other elements
      <MendSidebar />
      // ... other elements
    </Sidebar>
    {children}
  </SidebarPage>
  // ...
);
// ...
Install the Mend Backend plugin for Backstage:
The backend plugin provides the server-side functionality for the Mend Backstage integration. This plugin is required for the frontend plugin to function and handles API communication with the Mend.io platform to retrieve project details and security findings with permission management.
Prerequisites
-
Mend Activation Key to fetch results from Mend. The steps to obtain and configure the key are described in the installation instructions of the frontend plugin
Installation
From your Backstage root directory, install the Mend backend plugins:
yarn --cwd packages/backend add @backstage-community/plugin-mend-backend @backstage-community/plugin-catalog-backend-module-mend-entity-processor
In your packages/backend/src/index.ts file:
backend.add(import('@backstage-community/plugin-mend-backend'));
backend.add(
  import(
    '@backstage-community/plugin-catalog-backend-module-mend-entity-processor'
  ),
);
Projects Cache Refresh (Optional)
The plugin using a cache mechanism to store the project details from Mend for better performance on data retrieval. By default the data will be refreshed on every 240 minutes (4 hours).
Use the following configuration to modify that refresh cycle:
mend:
  activationKey: ${MEND_ACTIVATION_KEY}
  cacheRefresh: 240
Projects Control (Optional)
The plugin supports configuration-based permission control to filter which projects are visible to users.
How It Works
-
Project Filtering: Provide a list of project IDs in the configuration to filter projects
-
Control Modes: Use the
excludeproperty to control the filtering behavior:-
true(blocklist mode): Show all projects EXCEPT those in the list -
false(allowlist mode): Show ONLY projects in the list
-
Configuration
Add the following configuration to your app-config.yaml or app-config.production.yaml:
mend:
  activationKey: ${MEND_ACTIVATION_KEY}
  permissionControl:
    ids:
      - <project-uuid-1> # Project UUID to filter
      - <project-uuid-2> # Another project UUID
    exclude: true # Set to true for blocklist mode, false for allowlist mode
Configuration Options
|
Option |
Type |
Default |
Description |
|---|---|---|---|
|
|
Array |
- |
Array of project UUIDs to include or exclude |
|
|
Boolean |
|
Filtering mode: |
Mode Examples
Blocklist Mode (exclude: true)
permissionControl:
  ids:
    - project-123
    - project-456
  exclude: true
Result: Show all projects except project-123 and project-456
Allowlist Mode (exclude: false
permissionControl:
  ids:
    - project-789
    - project-101
  exclude: false
Result: Show only project-789 and project-101
Configure Mend Plugin Permissions (Optional)
The Mend plugin for Backstage offers methods to construct conditional permissions, an additional top layer for filtering projects, which can be integrated into your Organization’s Permission Policy.
-
Provide a list of project IDs to the plugin. This will enable it to filter projects.
-
Use the
excludeproperty to fine-tune the filtering behavior, ensuring precise control over which projects are included or excluded from the permission set.
To filter the mend projects, use the following configuration in your local app-config.yaml or production app-config.production.yaml file:
Here is a sample:
mend:
  activationKey: ${YOUR_ACTIVATION_KEY_HERE}
  permissionControl:
    ids:
      - <project-uuid-1> # Project UUID to filter
      - <project-uuid-2> # Another project UUID
      exclude: true # Set to true for blocklist mode, false for allowlist mode
Configure Mend Plugin for Spotify Portal
Note: Ensure you have Administrator access before configuring the Mend plugin.
The Mend Plugin also supports the Spotify Portal. To install the plugin into the portal, use the same npm packages:
-
@backstage-community/plugin-mend -
@backstage-community/plugin-mend-backend -
@backstage-community/plugin-catalog-backend-module-mend-entity-processor
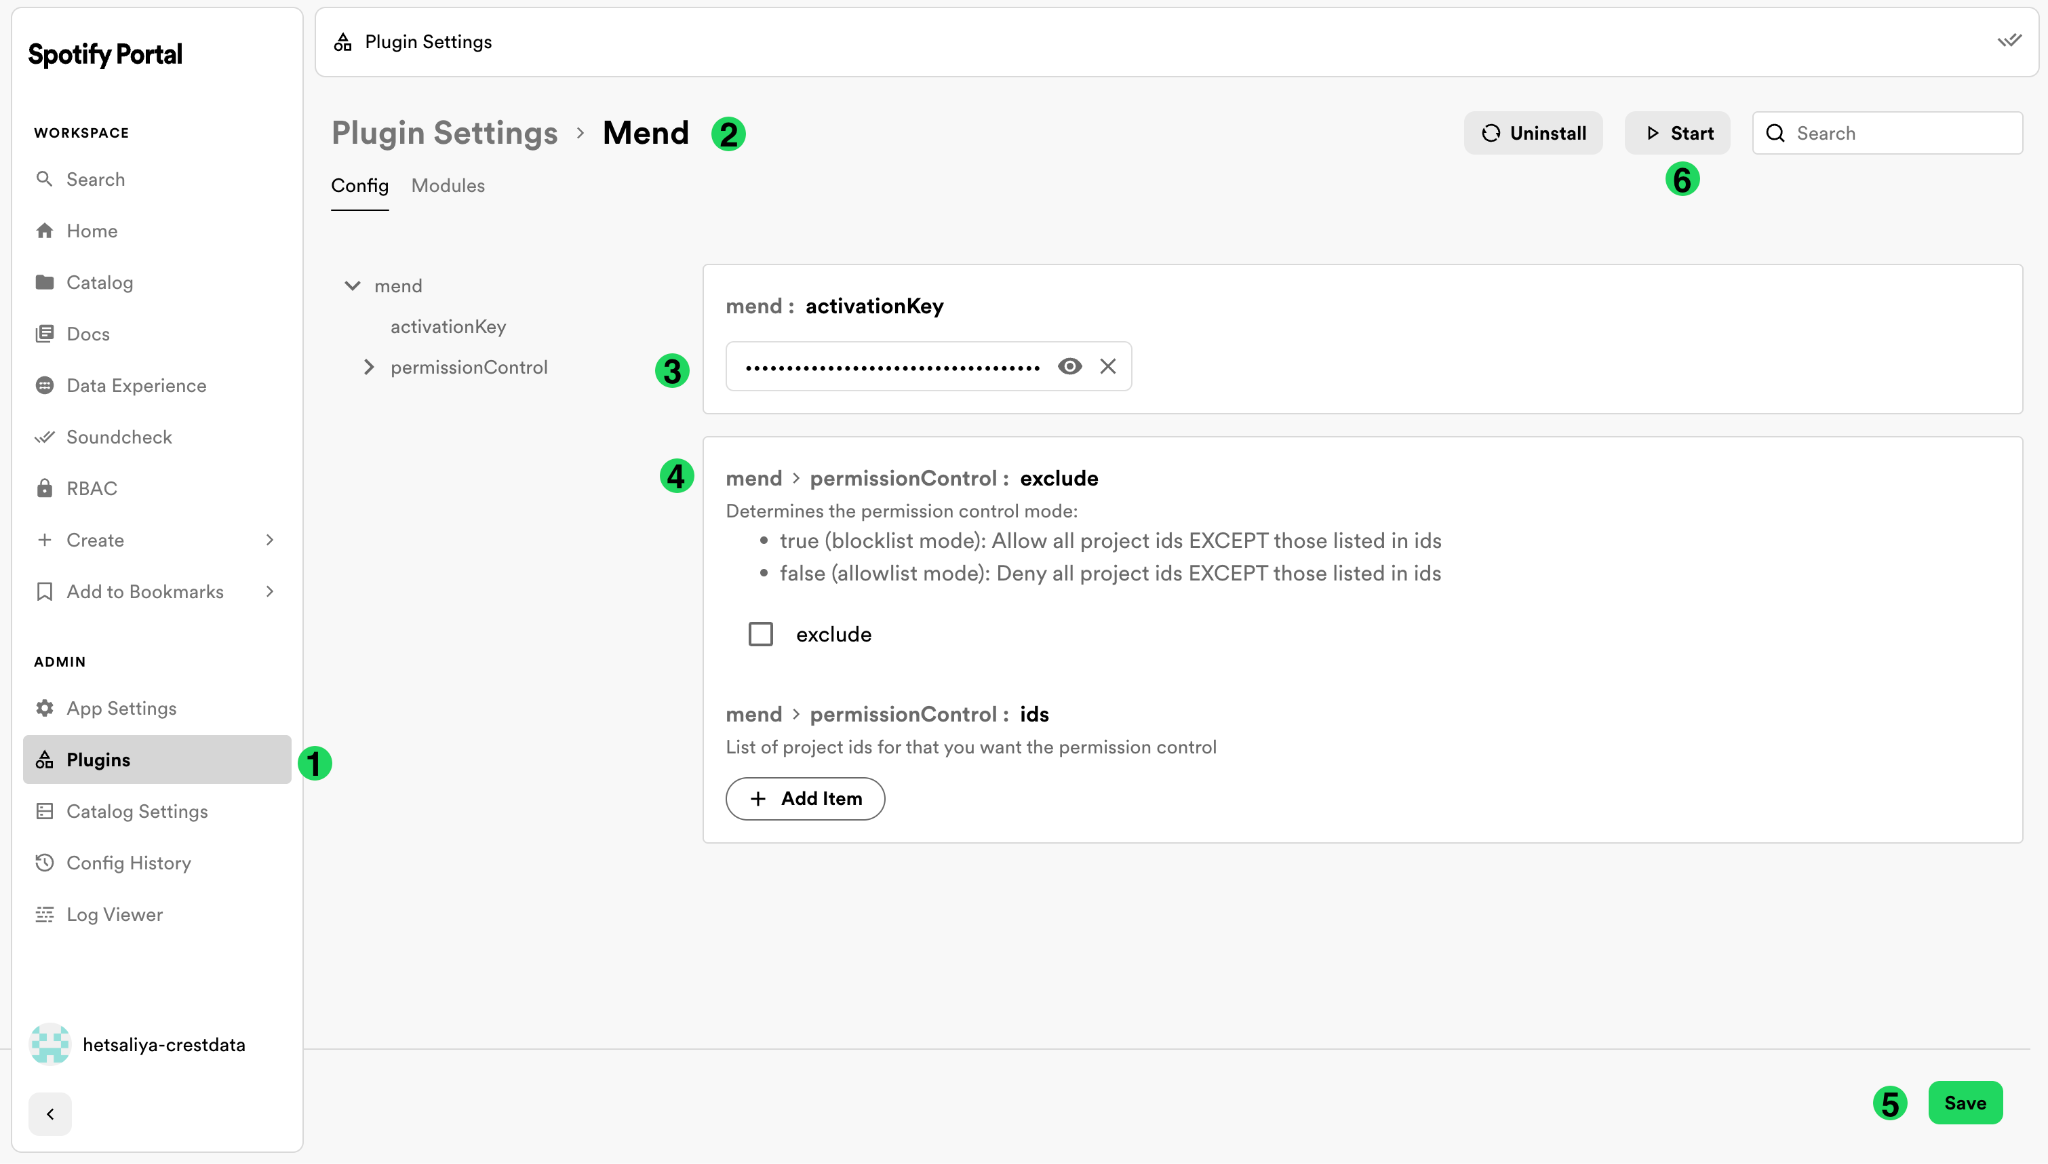
Installation Steps
-
Navigate to the Plugins section
-
Click on the Mend Plugin - this will redirect you to the Mend configuration page
-
Enter your Mend activation key in the
activationKeyconfiguration field -
(Optional) Change Cache Refresh value in minutes to change the refresh cycle. Default: 240 minutes (4 hours)
-
(Optional) Configure the Permission Control section as needed to filter Mend projects using ids
-
Save your configuration by clicking the Save button
-
Start the plugin and wait for the confirmation message indicating successful installation.
-
To start the Catalog backend module (Mend Entity Processor), navigate to the Plugins section.
-
Select the Catalog Plugin to open the Catalog configuration page.
-
Click the Modules tab.
-
Search for the
@backstage-community/plugin-catalog-backend-module-mend-entity-processorcard and select Manage module. -
This plugin does not require any additional configuration. To enable it, click the Start button.
-
A pulsing message saying Applying new configuration… will appear in the top-right corner while the settings are being saved. Once complete, the message will update to New configuration applied successfully. Click Reload to apply the updated configuration.
-
The Mend Plugin with the Catalog backend module (Mend Entity Processor) is now installed and running successfully.
Once completed, you will be able to see the Mend plugin on the sidebar navigation.
Review the Code Findings Results in Backstage
The Mend.io plugin for Backstage provides two views for display. You can use these views to visualize your data.
Project Overview
This view showcases the integrated project list along with statistics derived from these projects.
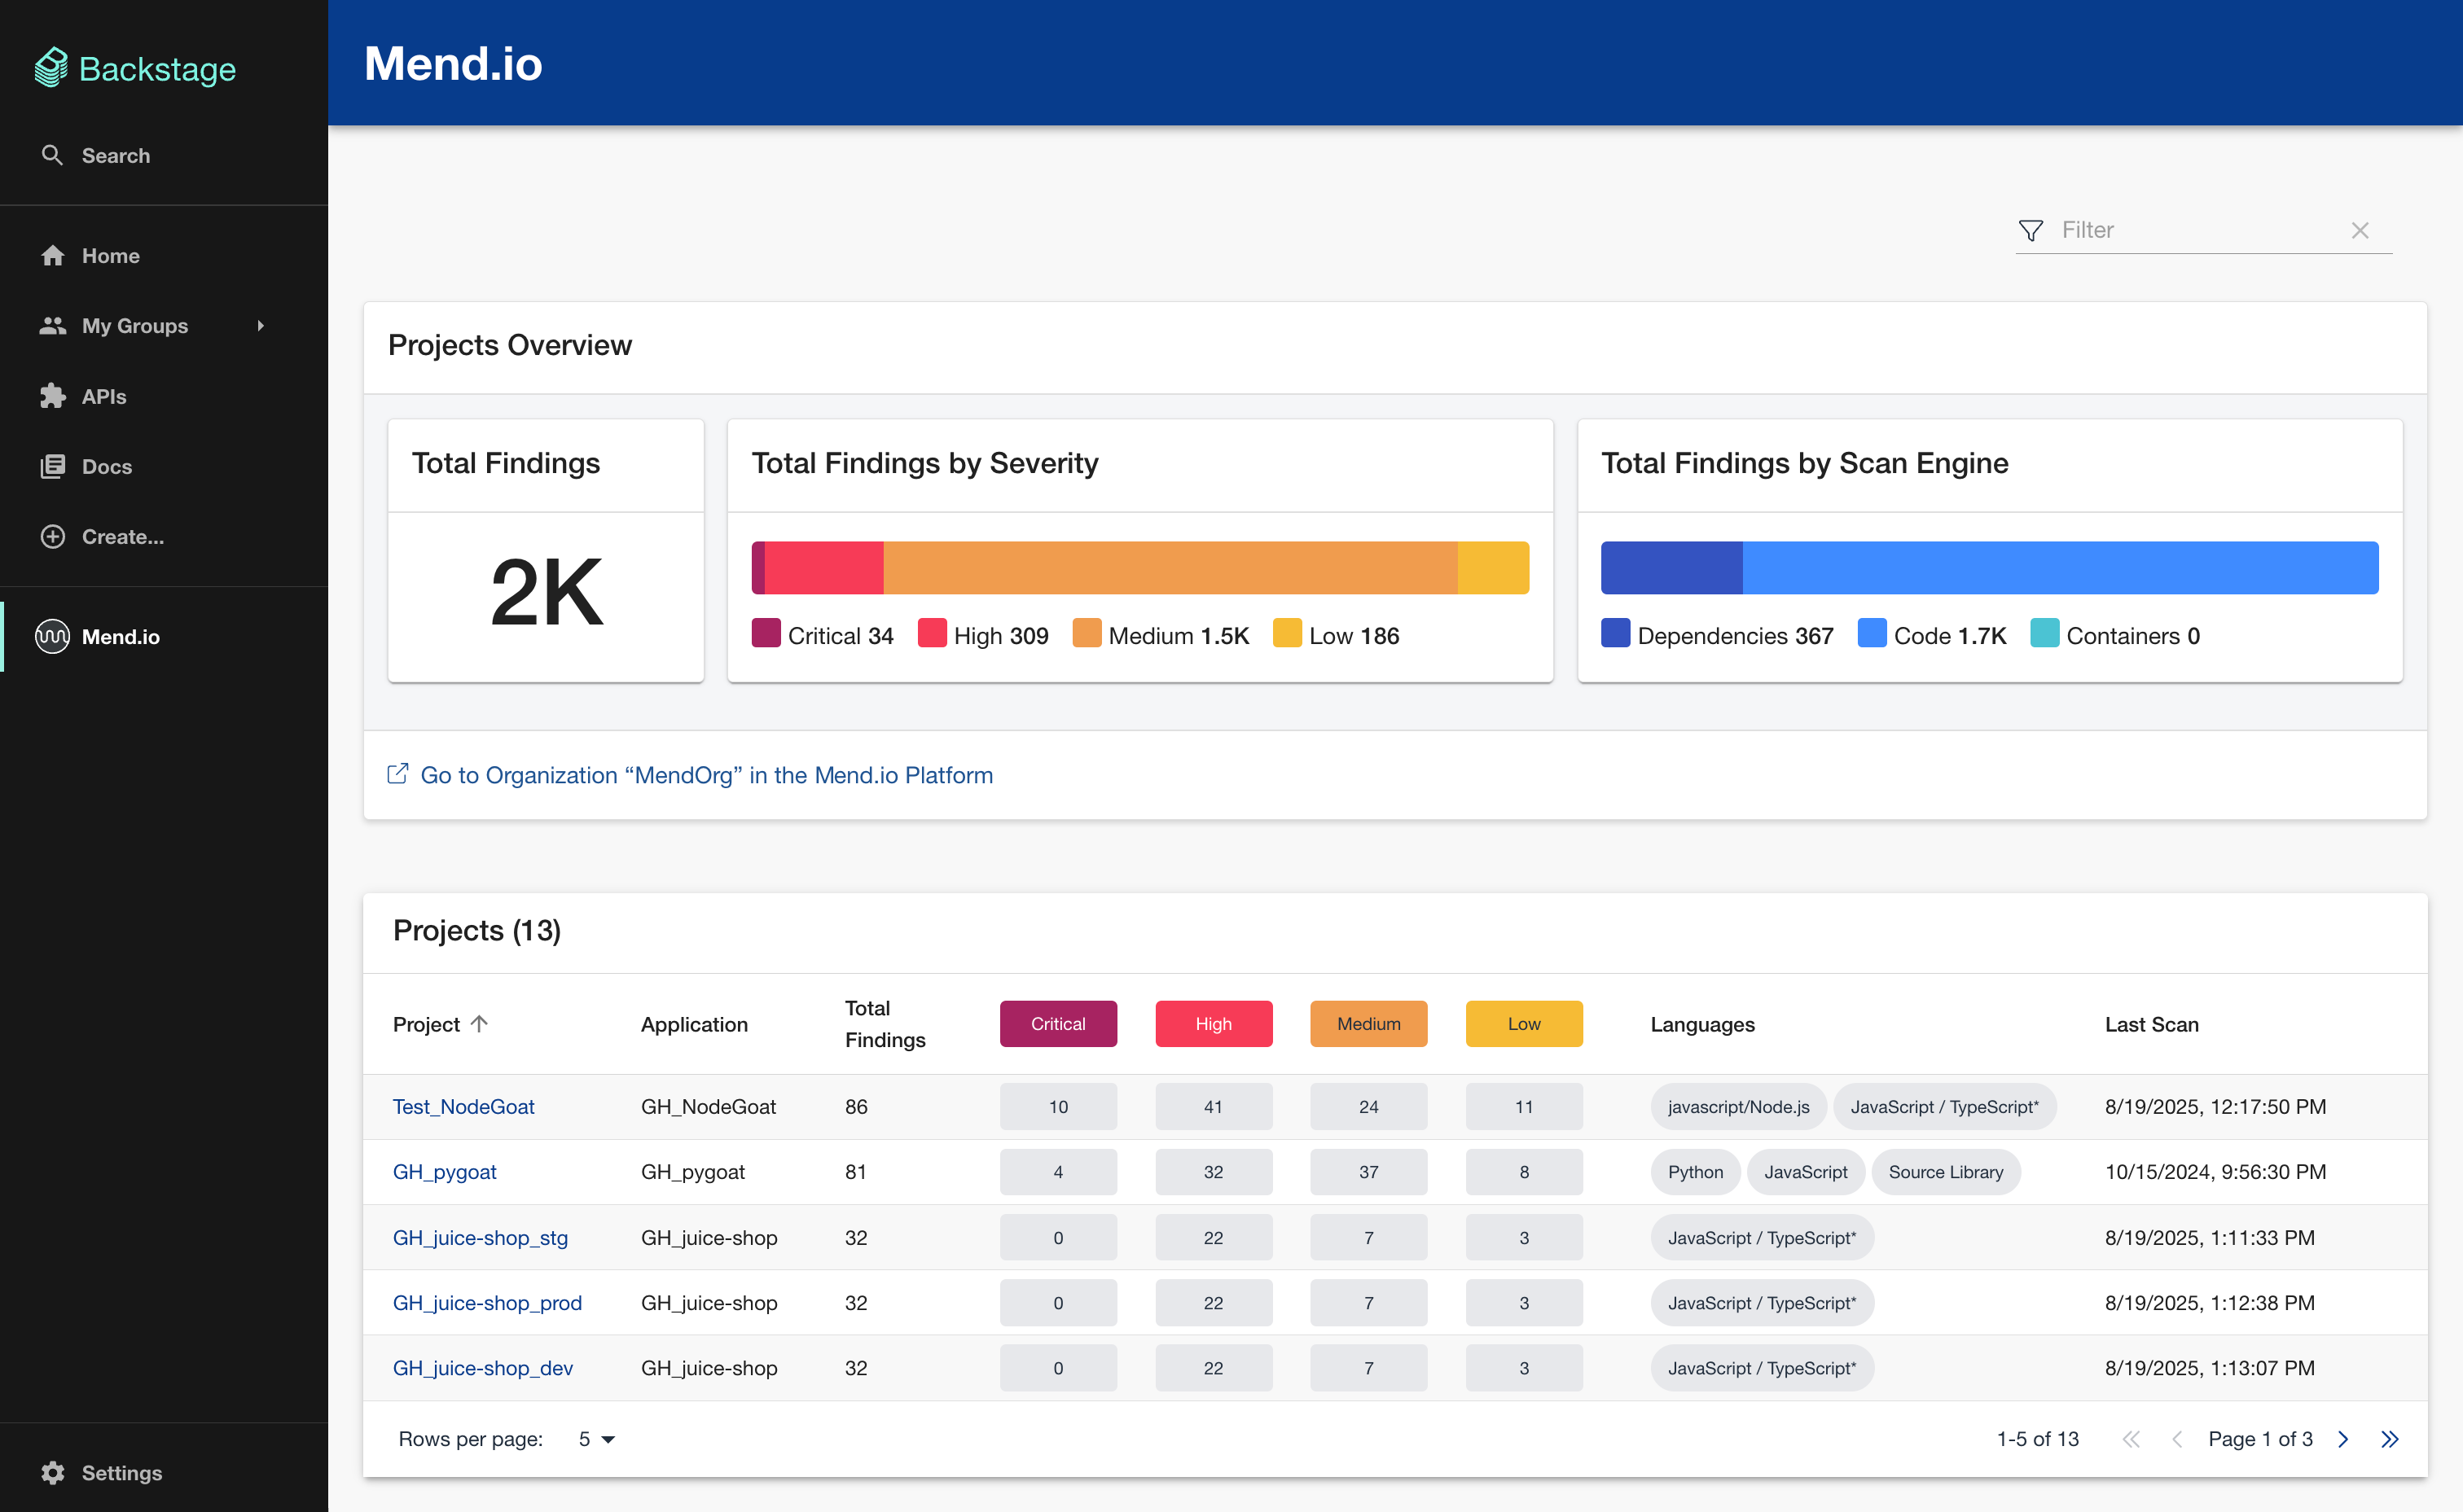
Findings Overview
This view presents the project's security findings and detailed statistics derived from these findings.
.png?cb=f8bb2f9322e1ec390c198f95dfcea6c3)